![]()
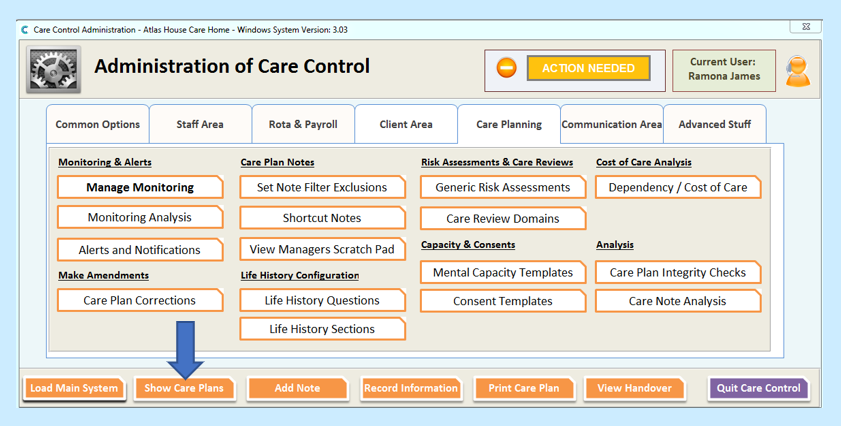
To add cream charts to Care Control Windows, go to the Administration of Care Control.
Go to Show Care Plans.
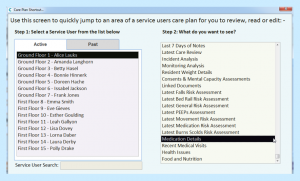
Select the Service User from the list on the left-hand side and on the right select Medication Details.
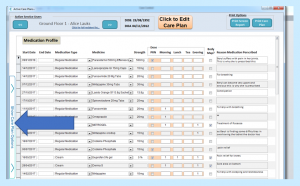
Select Click to Edit Care Plan from the top bar of the screen.

Select Click to Change Record, also from the top bar of the screen.

This will create a blank record for you to enter your cream. If you already have medicines entered here, you will find your blank record at the bottom of the list.

In the Start Date enter the date the Service User began using this cream.
In the End Date section just leave this blank until stopped by a Doctor as if you put an End Date it will no longer appear on the screen for staff to administer.
In Medication Type select Cream from the drop-down.
In Medicine select your medicine from the drop-down. You can start to type the cream to save time searching through the list. If your cream does not appear, the system will allow you to add this manually in this field.
Enter the strength in the Strength field.
Next you need to enter the dose details. If the cream is PRN, tick the box under PRN.
You do not need to tick any of the Morning/Lunch/Tea/Evening boxes as the automatic default for Creams is morning and evening – anything different than this and the cream should be added to eMAR.
If you require a body map to show carers where to apply the cream, tick the box under Body Map.
Enter your reason the medication has been prescribed in the box under Reason Medication Prescribed and where on the body it goes as this information is pulled through to the Body Map which staff follow.

To save your cream select Click to Save on the top bar of the screen.

If you ticked the box under Body Map you will now need to enter this information.
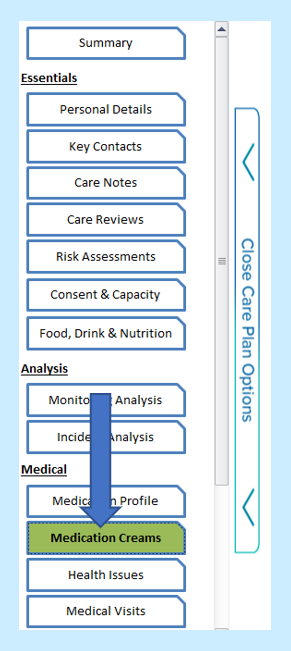
Select Show Care Plan Options from the left side of the screen.
Select Medication Creams from the list.
Select Click to Edit Care Plan from the top bar of the screen.

Select your Cream from the cream name option by using the blue arrows to the right and left until you find the cream you created. Also enter the required information in the How to be applied and Frequency of Application boxes.

Select Click to Change Record from the top bar.

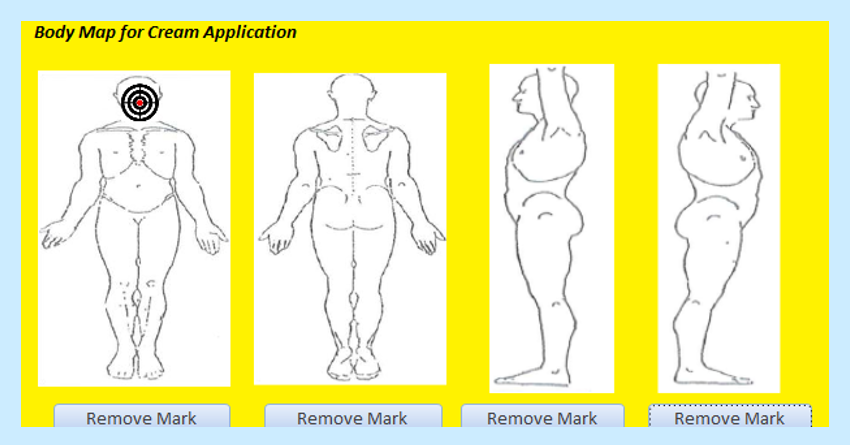
Once the background turns yellow, you will be able to select on the body map where the cream needs to be applied by simply clicking on the part of the body to create a target. If you make a mistake whilst doing this, select Remove Mark to remove the target. You are able to enter 1 target per map.
Select Click to Save Any Changes from the top bar.
