With this release we have created a new payroll system. Although some of the calculations are based on the old payroll, in reality this is new. It can be used in conjunction with the old payroll for now.
Conceptual Changes
It is important to understand the key conceptual changes to Payroll 2.0.
Timesheets replaced with Work Records
We have removed the concept of a Timesheet in this release and replaced it with a Work Record.
The timesheet is a document that staff members can complete, change and amend.
The Work Record is generated by the Roster System based on what work we believe has / will be completed. The user can request adjustments to the Work Record, but those adjustments need to be confirmed and verified.
Payroll Managers
The responsibility of reviewing adjustment requests can now be shared across multiple people in the form of Payroll Managers. These can be restricted to a team or the entire company, with access permission restricted to key areas of the Payroll System.
Exception Based Analysis
The purpose of Payroll within Care Control was always to allow you to review the data and amend it if you feel it was incorrect. However, you had to “look” for the issues. In this new release, the system can be configured to identify “issues” and present options for you to correct, ignore of modify the outcome of those issues.
Support for Travel
Within this new release we have added specific support of staff journeys, mileage and travel costs.
Recurring Exceptional Lines
Within this release you can set-up recurring exceptional lines. This could be for statutory payments, loan repayments or a recurring bonus.
Holiday Pay Recalculated
We have added support for the correct method of calculating holiday pay based on the latest government directives. Holidays are added to the Work Record independently from the Roster, something that the old Payroll did not do.
Extensive Reporting
The new Payroll includes many more reports that can be used for analysis of your monthly pay run.
Getting Started
You can only access the new Payroll through CC Windows. On this release it is under a BETA release as we want you to use it, but understand it may contain bugs or errors.
It is assumed that you: –
- Understand how to add / amend staff pay rates
- Have created a Payroll Calendar
Under Time & Attendance you will see the two new options: –
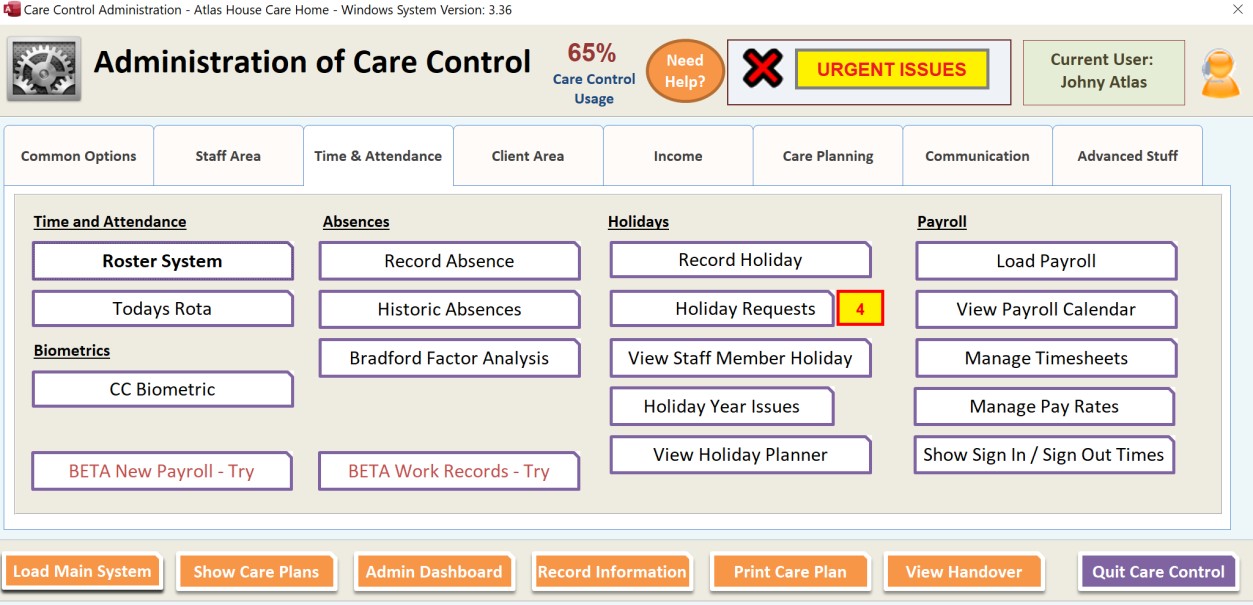
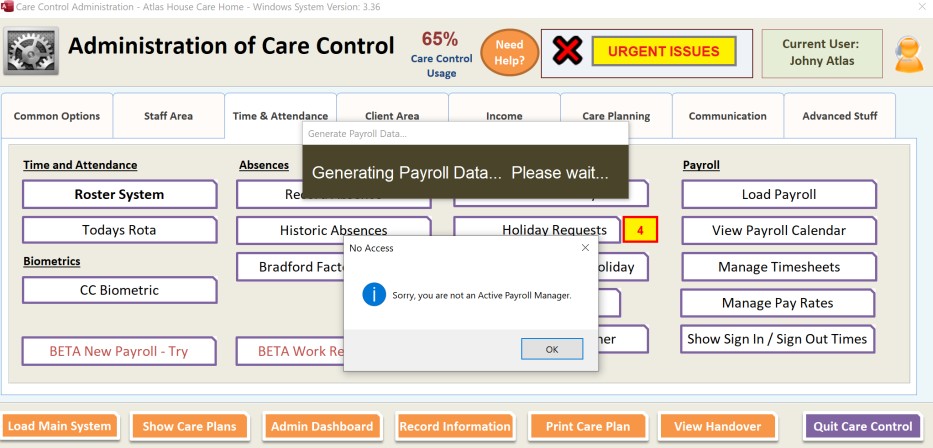
Click on BETA New Payroll – Try and you will see the following error message: –
Setting Up Payroll Managers
With this release we have introduced the concept of a Payroll Manager. A Payroll Manager is a staff member who has access to some part of the Payroll System. To create yourself as a Payroll Manager you first need to access the Payroll Settings.
Payroll Settings
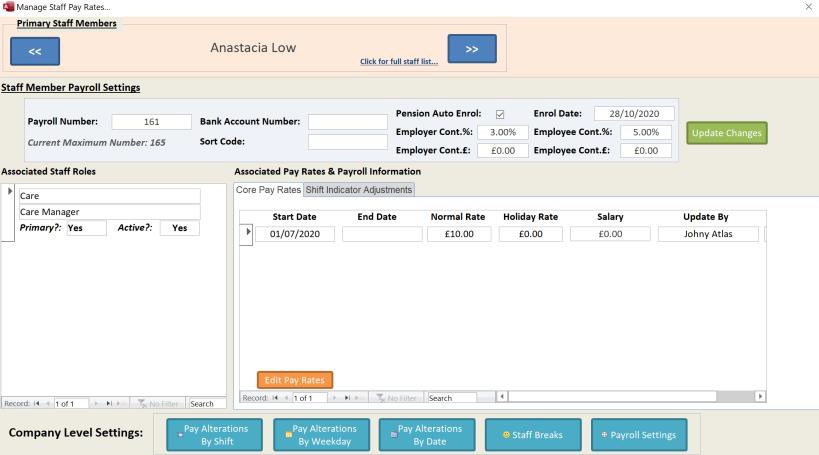
Payroll Settings can be accessed via the Manage Pay Rates section of Care Control. With this area you will see the Payroll Settings option: –
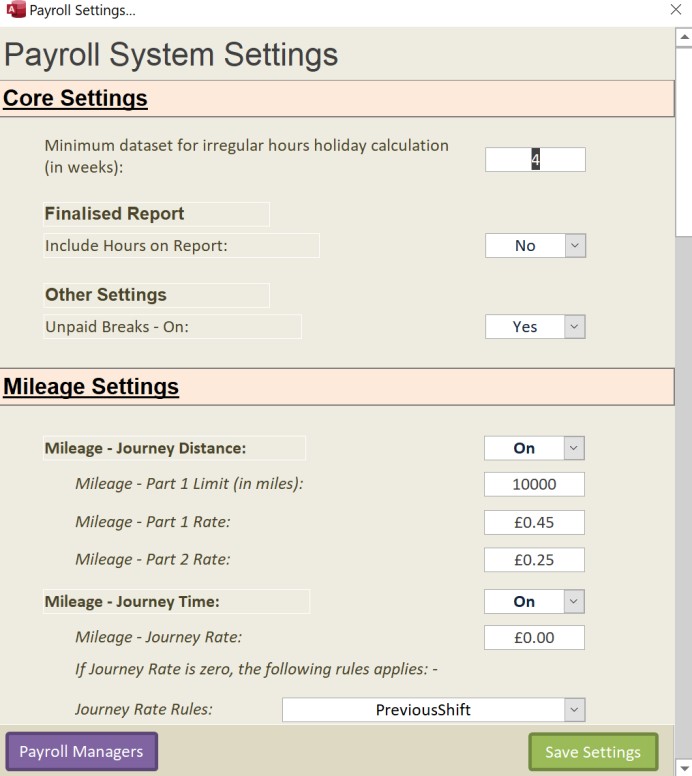
When you click on this button you will see the following screen: –
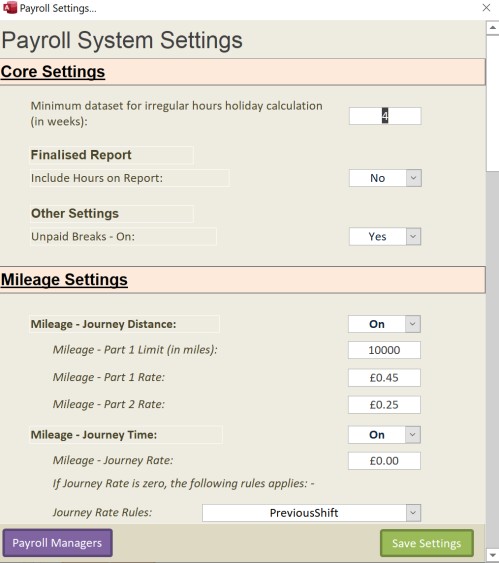
There are lots of settings here which we will touch on as we go through the Payroll System, but for now click on the Payroll Manager’s button in the bottom left: –
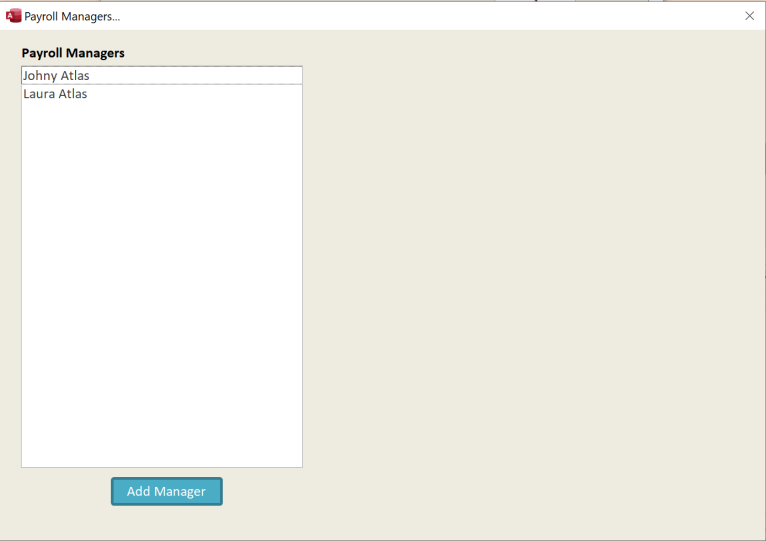
Click Add Manager to add a new Payroll Manager: –
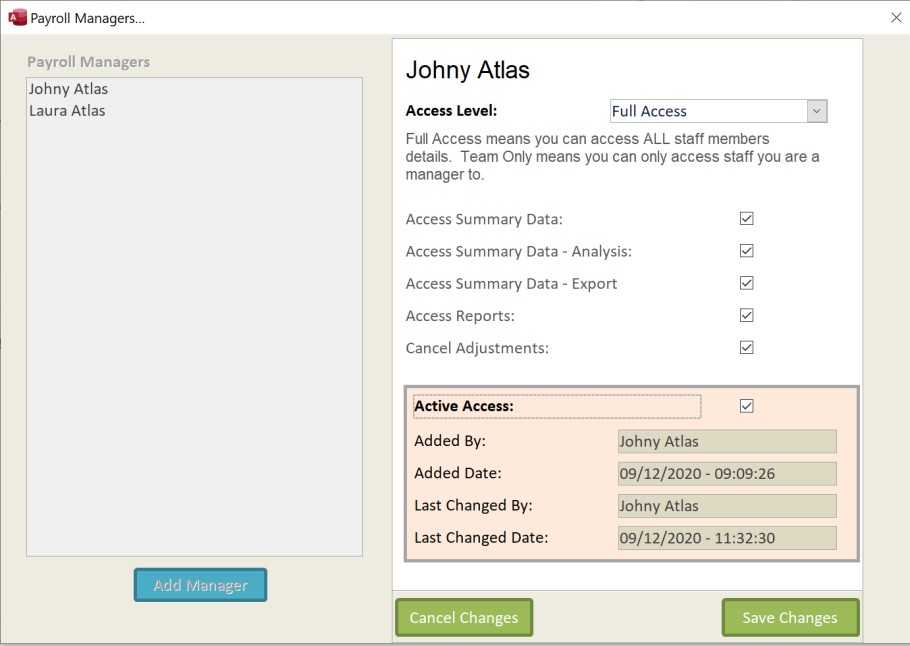
Here I have selected Johnny Atlas and given him Full Access. Full Access means they can access ALL staff pay records. The alternative is Team Only.
Manager’s Teams
A Payroll Manager can also be a Manager of staff. With this release we have added a Manager Field within the Staff Records area: –
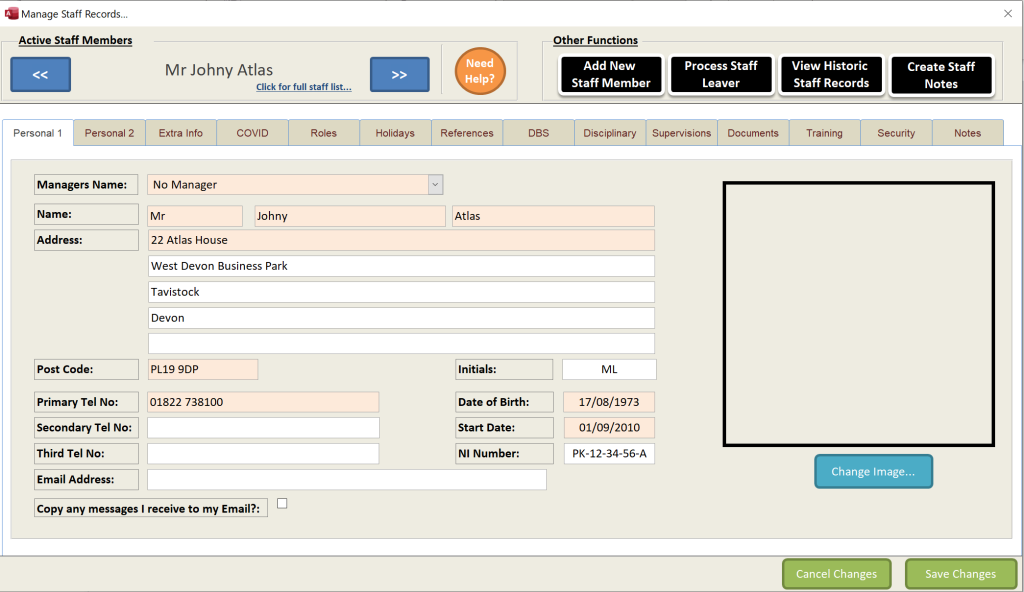
You can set this field for multiple staff members, creating a “team” of staff who report back to that manager.
Once you have created yourself as a Payroll Manager you can now access the new Payroll.
New Payroll – First Load
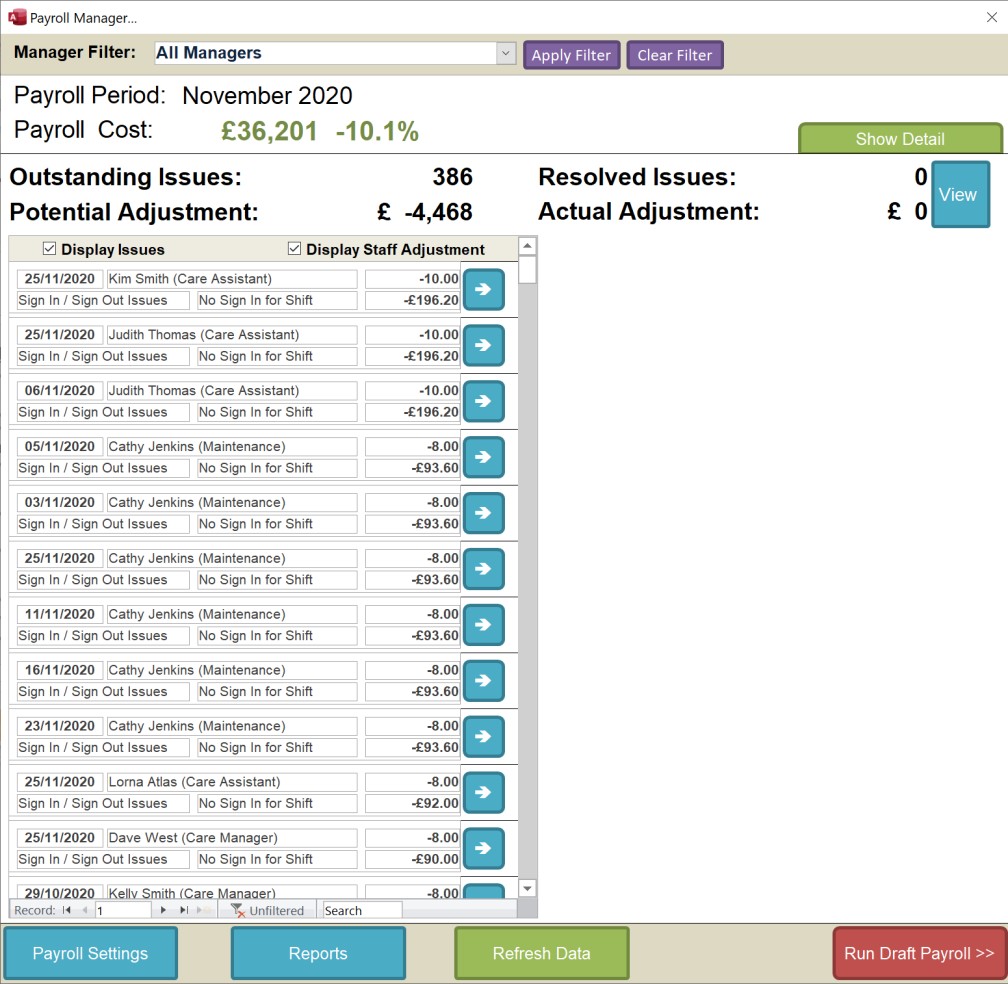
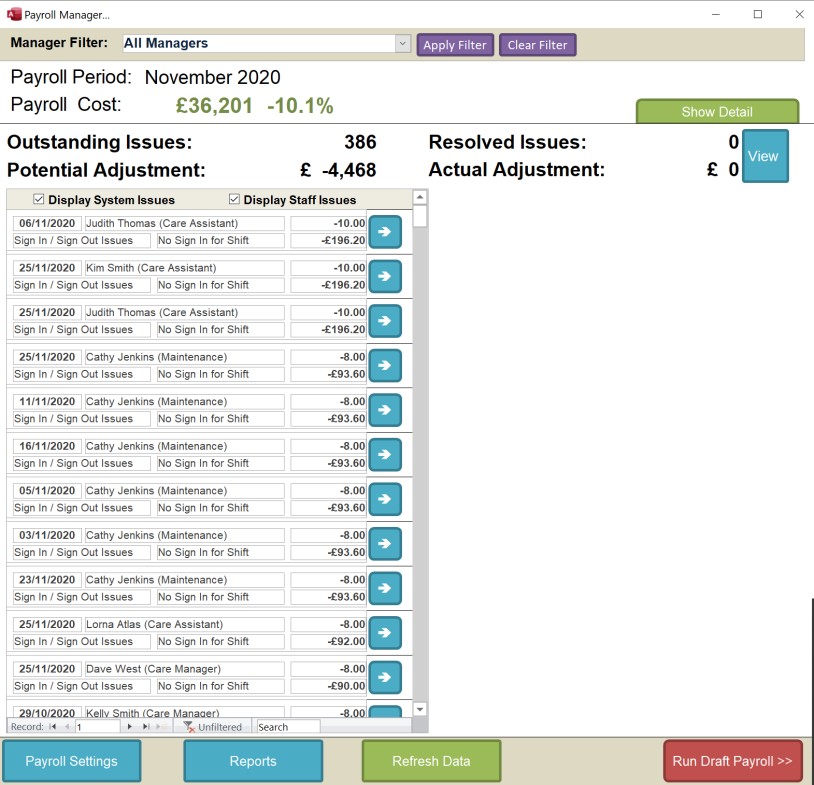
When the new Payroll System first loads you will see a screen similar to above. This screen has lots of information, so let’s go through each section: –

At the top you have a simple filter to look at the payroll through either your access or through a manager’s access. If you are a manager with Team Only access only your name will appear here. Only managers with actual staff assigned will be listed here.

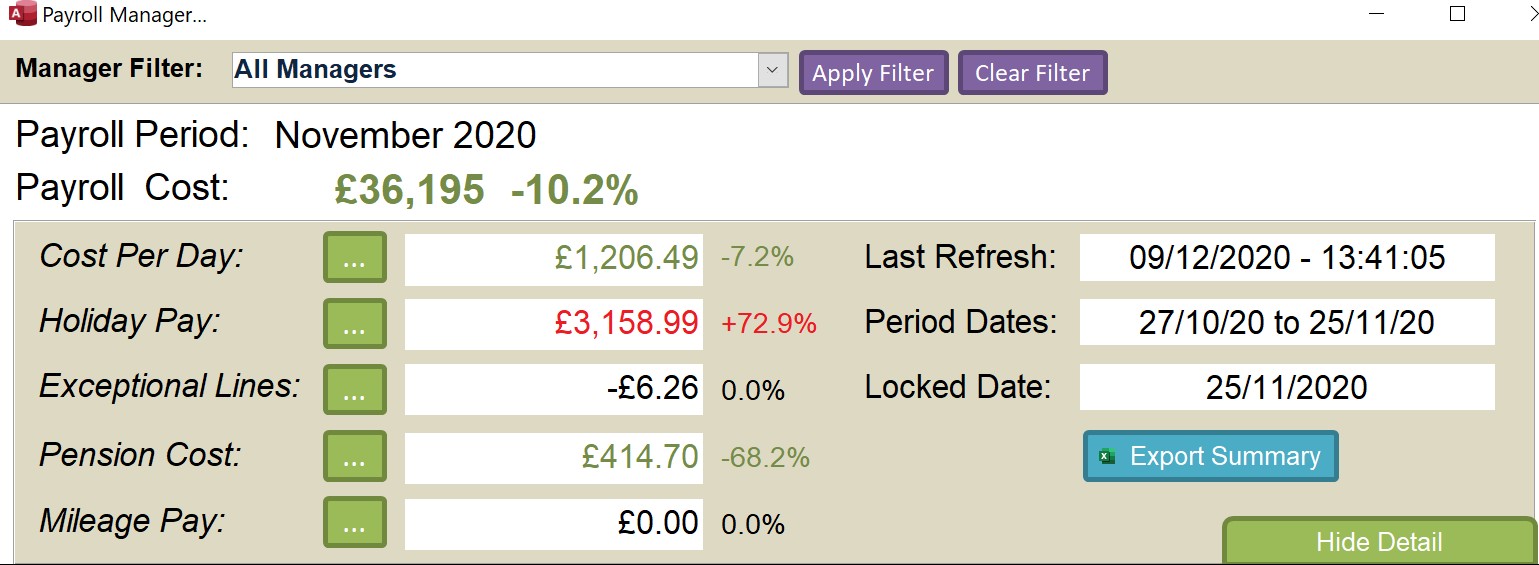
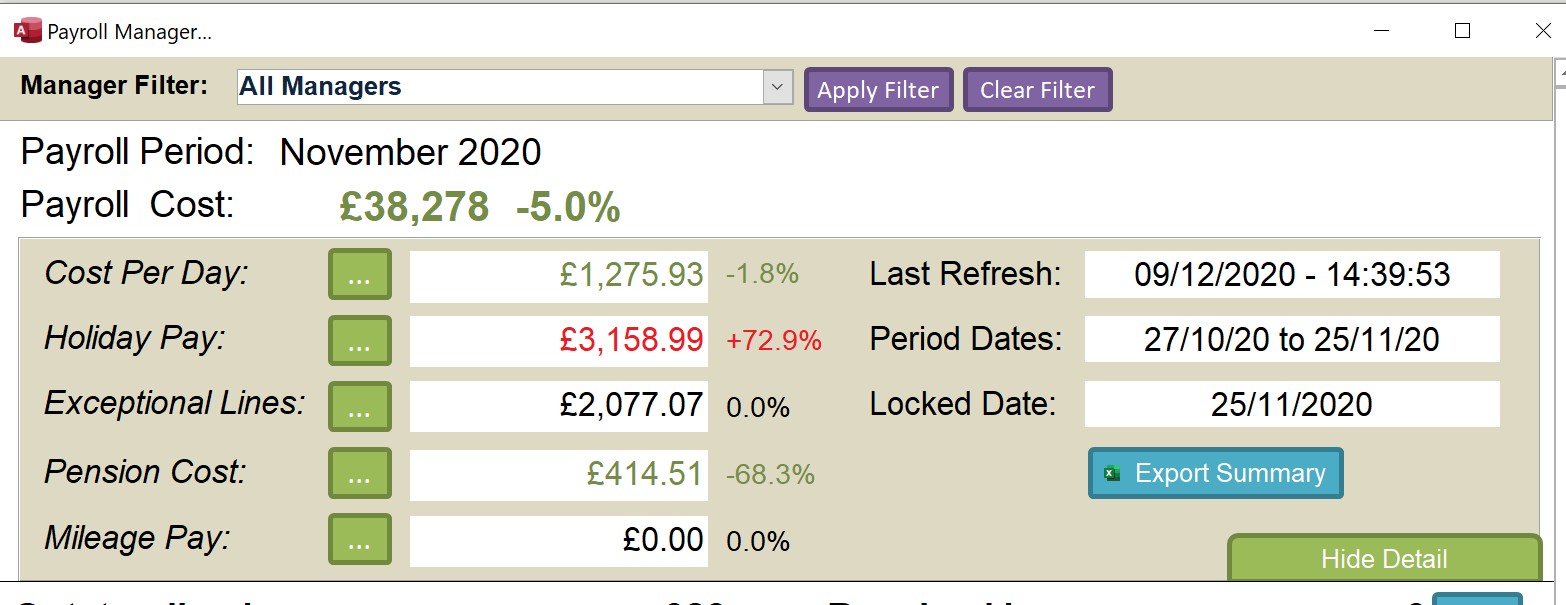
The next section loads the current active pay period (as you have named it in your calendar) and the total Payroll Cost with an indication as to how that cost has changed since the previous pay period.
The total cost is made up of: –
- Staff Working Hours
- Holiday Pay
- Travel Costs (if switched on)
- Exceptional Lines (including Adjustments)
- Employer Pension Contributions What does it NOT include (yet!): –
- Employer National Insurance Costs
- Statutory Payments (SSP or SMP etc.)
If you click on Show Detail you will see a breakdown of that number: –
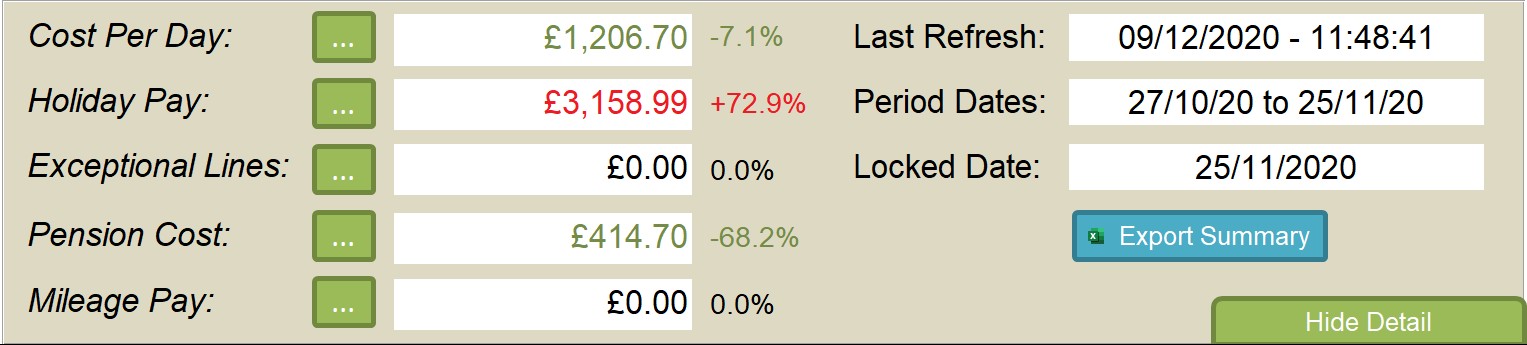
The green buttons  will either run a report or load a screen for further detail. The next section is about the issues and adjustments you have made: –

Issues
Issues are created by either staff members (through proposed adjustments) or automatically by the system (through the rules you have set in your system settings). The system provides a summary of the total number of issues you have to review, the potential adjustment saving (or cost) that agreeing to those issues will have, how many you have resolved and what the actual adjustment is.
The purpose of the new Payroll System is to review each of the issues generated and either confirm or refuse them.
Automatic Issues
You switch on which issues the system automatically processes within the Payroll System Settings. Clicking on this option you will see the following: –
If you scroll down you will see the Issues Options: –
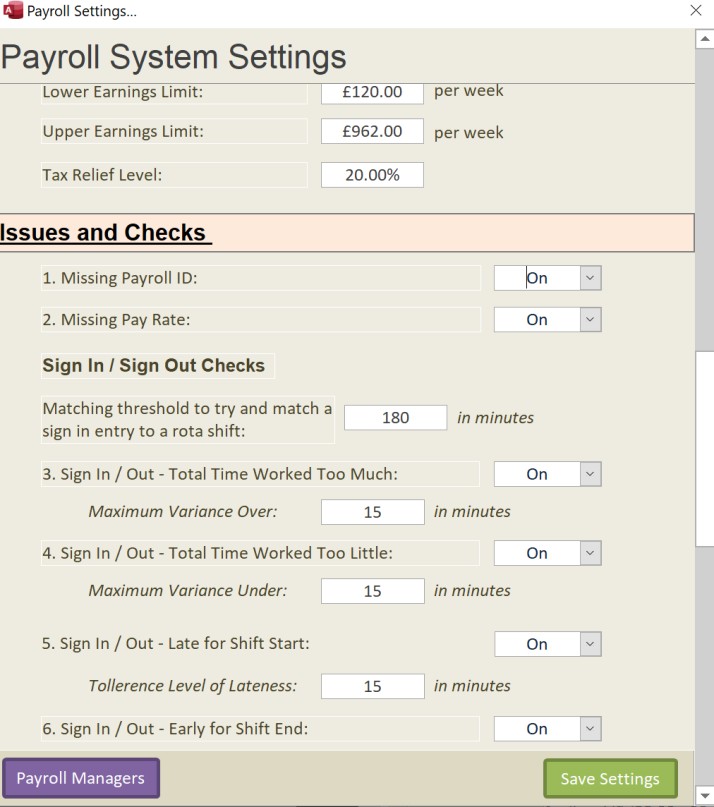
The checks you can configure are as follows: –
| Issue | Further Detail |
| 1. Missing Payroll ID: | This is a critical issue. Every staff member should have a Payroll ID as this is used to produce the final payroll report. If this check is left on you will get a warning if it identifies anyone on start up. |
| 2. Missing Pay Rate: | All staff who are on the payroll should have a basic rate of pay. |
| 3. Matching threshold to try and match a sign in entry to a rota shift: | The Sign In / Sign Out Issues have to try and match the activity of the staff member with a Roster Entry.
For example, if a shift on the rota states staff member should start work at 8am and finish work at 2pm, and they sign in at 9.30am, we want the system to link that sign-in event to the roster shift (e.g. they are 90 minutes late for work!). We need a threshold as it is possible for staff to have multiple shifts for a day. |
| 4. Sign In / Out – Total Time Worked Too Much:
Maximum Variance Over: |
If a staff member works too much time the system can generate an issue. For example, if a staff member is assigned a shift 8am until 2pm. If they sign in at 7.30am and sign out at 1.55pm, the total time they worked is 6 hours, 25 minutes.
You can set the maximum variance in which to flag the issue for you. So if you set that variance to 30 minutes the above example would not generate an issue. |
| 5. Sign In / Out – Total Time Worked Too Little:
Maximum Variance Under: |
The same as above, but this time working too little for a shift. |
| 6. Sign In / Out – Late for Shift Start: Tolerance Level of Lateness: | The staff member signed in late for the start of a shift. Tolerance Level of Lateness is how late can they be before the system generates an issue. |
| 7. Sign In / Out – Early for Shift End: Tolerance Level for Early End: | The staff member signed out early for the shift end. Tolerance Level for Early End is how early they can sign out without an issue being generated. |
| 8. Sign In / Out – No Sign In for Shift: | The staff member has shifts on the rota, but there is no sign-in information for that day. |
| 9. Sign In / Out – Sign In, but no Shift: | The staff member has signed in, but there is no shift on the rota. |
| 9. Sign In / Out – No Sign Out for Shift: | The staff member has shifts on the rota, but there is no sign-out information for that shift. |
| 11. Check In / Check Outs | For our community based customers we recommending using our Pocket Devices with the Geocode Check In / Check Out switched on. This is similar to Sign In / Sign Out, but also stores a GPS location of the staff member. |
| 12. Matching threshold to try and match a Check-in entry to a rota shift: | This is the setting that matches a check-in to a rota shift. Due to the tendency of community-based workers to have more shorter shift, this setting should not be set to too high a level. |
| 13. Missing location data for home care clients | If you are using Check In / Check Out you
need to make sure that Geo Code data is loaded for a client’s home address. This |
| check will warn you if there is any Geo Code data missing for a client. | |
| 14. Check In early for Planned Visit: Tolerance Level for Early Start: | This can flag if a staff member has checked in early for a shift. The Tolerance Level for Early Start is in minutes and indicates when the issue will be raised. For example, if the target time on the rota is to be there at 9am and the staff member checks in at 8.50am, if the Tolerance Level for Early Start is set to 5 minutes then the check in would generate an issue. |
| 15. Check In late for Planned Visit: Tolerance Level for Late Start: | Reverse of the above check, this is if a staff member checks in late for a visit. |
| 16. Check Out early for Planned Visit: | Flags as an issue if the staff member checks out early. The tolerance level is the same as above. |
| 17. Check Out late for Planned Visit: | Flags as an issue if the staff member checks out late for the planned visit. The tolerance level is the same as above. |
| 18. Check In Missing for a Planned Visit: | Visit is on the Roster System, but no check in has been recorded. |
| 19. Checked In, but no planned visit: | Staff member has checked in, but there is no Roster entry for the visit. |
| 20. Check In outside of specified range for Client: | The check-in occurred, but the GPS reading indicates outside of an acceptable range. |
| 21. Check Out outside of specified range for Client: | The check-out occurred, but the GPS reading indicates outside of an acceptable range. |
| 22. Acceptable Check In / Out Range: | A value to indicate the maximum distance away a check-in or check-out can occur. The GPS for the client’s location is based on the post code. Post Codes can have a broad range of a few hundred metres, so there will often be a variance. We recommend that you should set a minimum of 500 metres (or 0.5). |
Contiguous Shifts
It is common to have shifts that adjoin each other, especially if you are using shift indicators to pay differently for a specific shift. Look at this example: –
A care worker will occasionally “step up” to be in charge of a shift. During this in charge period, the care worker would receive an increase in pay rate.
In this example the care worker worked an 14:00 to 22:00, or an 8 hour shift. But between the hours of 4pm and 8pm they were asked to be in charge.
On the Roster System the shifts would be: –
- 14:00 – 16:00
- 16:00 – 20:00I
- 20:00 – 22:00
Note the use of “I”, which for this care home is a shift indicator meaning “In Charge”. The Payroll System will treat the contiguous shifts differently.
Shift 1: 14:00 – 16:00
This shift the system will expect a Sign In, but no Sign Out.
Shift 2: 16:00 – 20:00I
This shift the system will not expect any Sign In or Sign Out
Shift 3: 20:00 – 22:00
For this shift the system will expect a Sign Out, but no Sign In.
Dealing with Issues
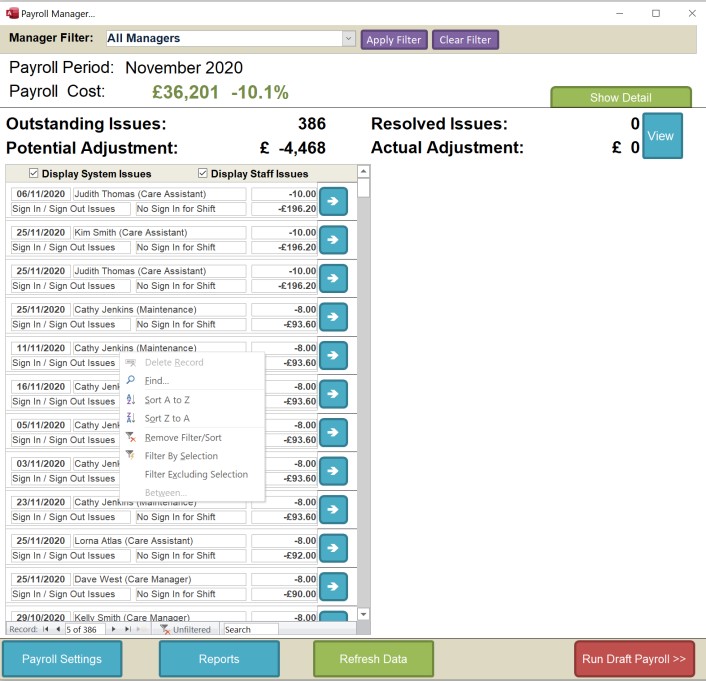
When you load Payroll any issues appear on the left hand side of the screen: –
You can filter or order this list by right clicking on your mouse: –
Each issue can be looked into by clicking the blue button: –

The following is an example of an issue: –
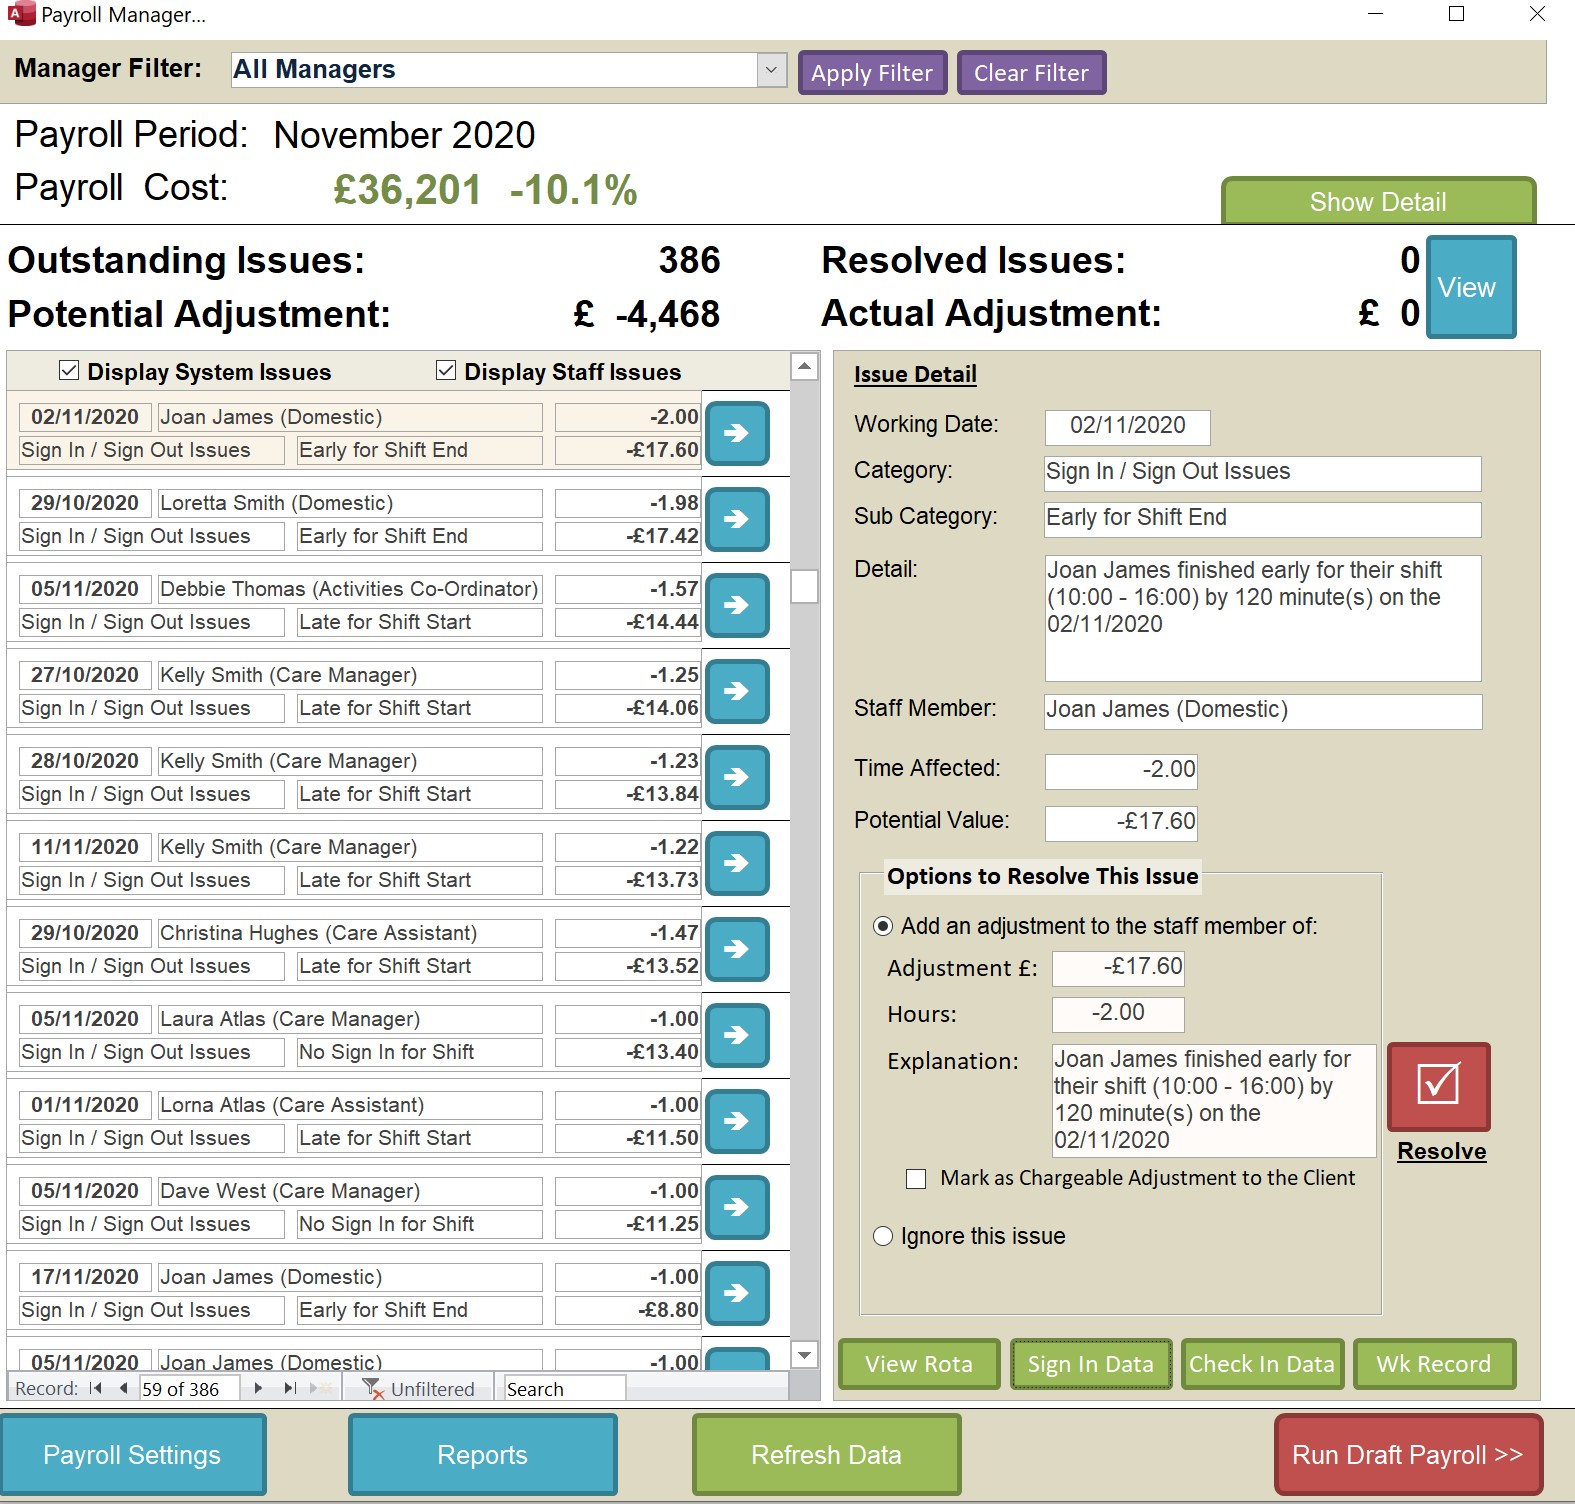
In this example we have a staff member (Joan James) who was supposed to work a 10:00 until 16:00 shift and signed out early by 2 hours.
On the right you have the issue detail and on the bottom right you have the ways to resolve the issue: –
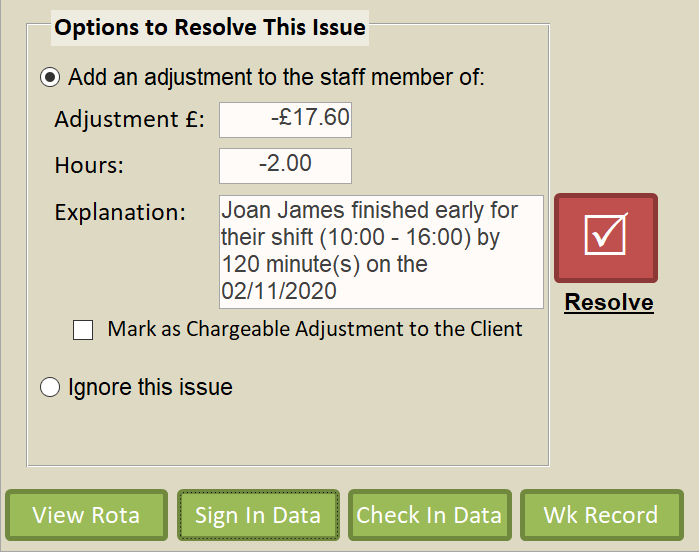
You have two options: –
- Add an adjustment
You can amend the adjustment amount and hours at this stage if you want.
- Ignore the issue
Ignoring the issue means that no adjustment will be made and the issue will just be removed.
At the bottom you will see buttons to help you look into the issue. In this example I will press the Sign In Data button to see what the full sign-in time was: –

As you can see the staff member actually signed in just after 8am and finished at 2pm. This looks like the rota has not been updated. In this case I would opt to Ignore this issue.
Another example: –
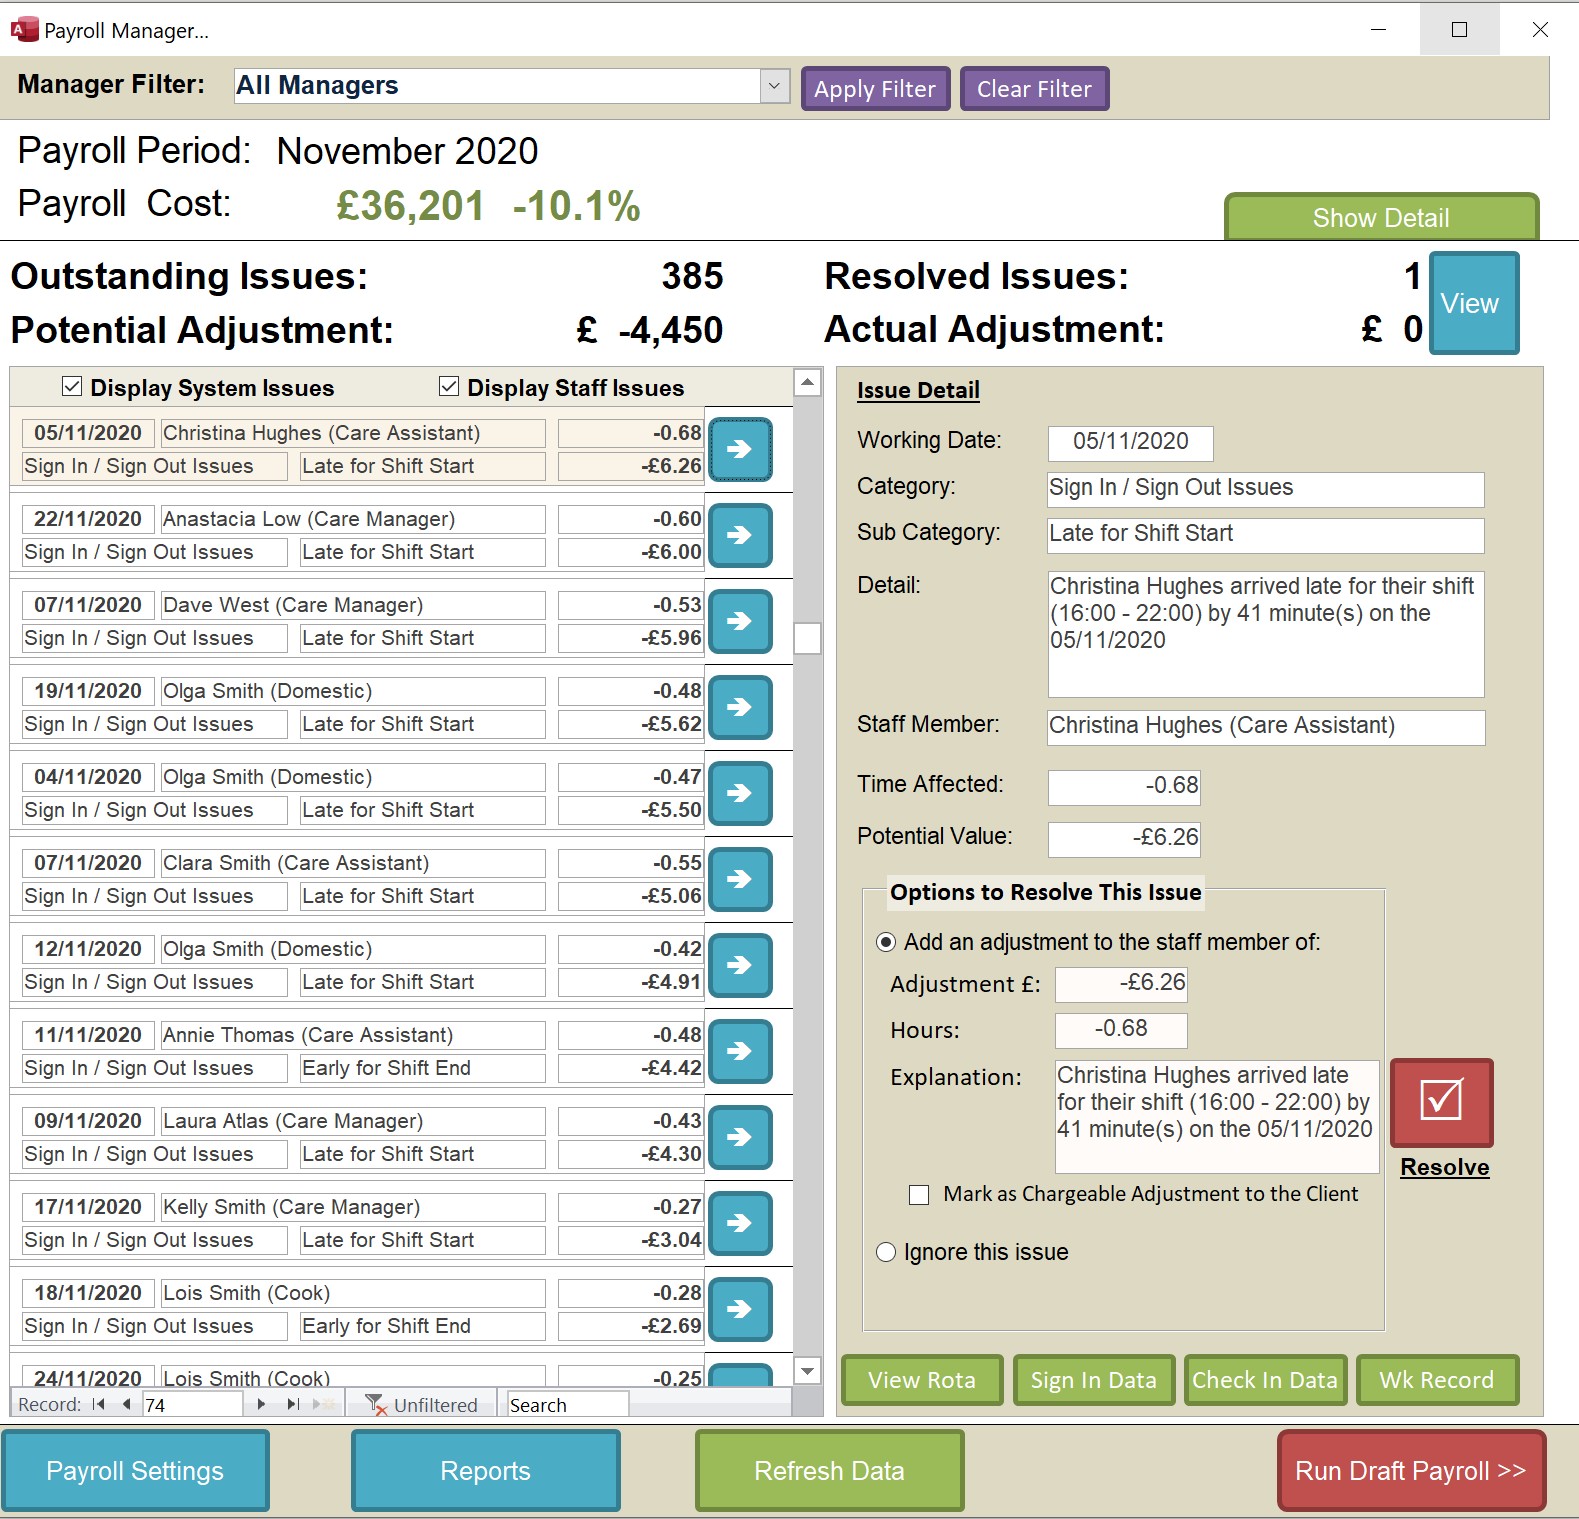

In this example the staff member arrived late for her 4pm shift. The Sign In time shows the following: –

In this example I will select to add the adjustment.
When the issues are resolve the Payroll Cost, Summary Data and the Issues Summary are all updated: –
Staff Issues
Along with the system-generated issues, there are Staff Issues which come from the staff members requesting adjustments to their Work Record. These are mixed into your issues screen, but can be separated by simply choosing not to show the system issues: –

When you click on a Staff Issue you can a different screen: –
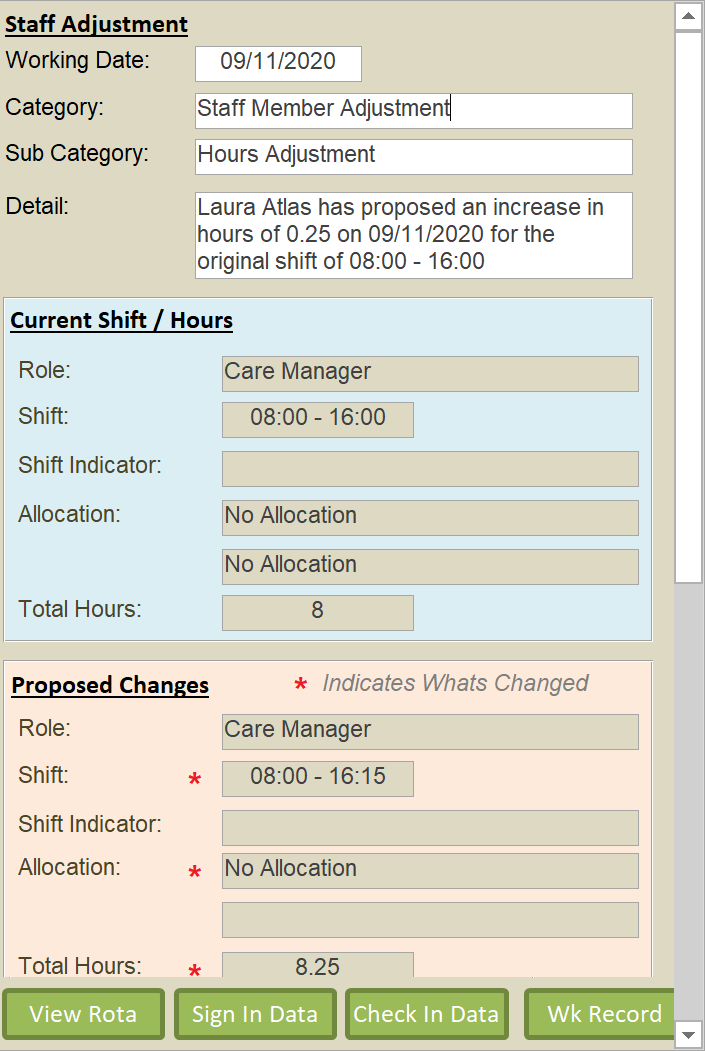
You are shown a summary of the issue, the Current Shift, the Proposed Changes.
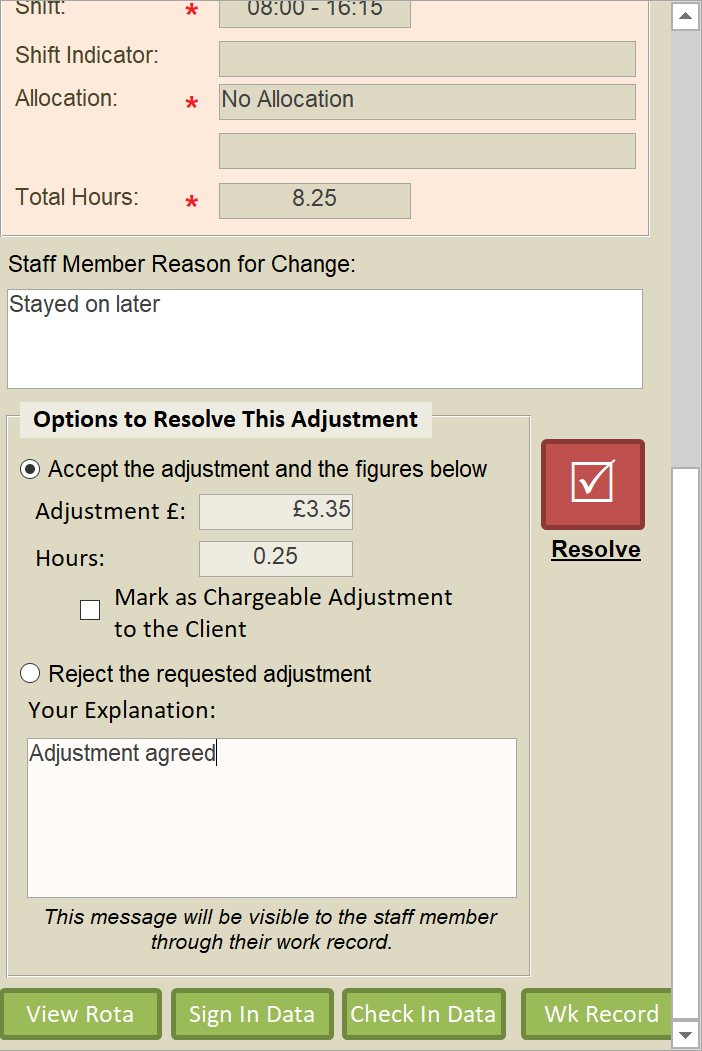
And further down the difference in cost and hours and the option to either accept the adjustment or reject it.
Note: You cannot amend the adjustment amount. This is because the adjustment has originated from the staff member. You can either accept it or reject it.
In the above example a staff member (Laura Atlas) has requested an adjustment because she says she stayed on late by 15 minutes. However, looking at the sign in / sign out data she appears to only have worked until 9 minutes later: –

Due to this I will reject this request stating this: –

I then press the Resolve button and the issue is rejected. The staff member will be able to see that message on their Work Record.
Viewing Resolved Issues
If you have resolved issues you can view them at any time by clicking the View button: –

This shows the below screen: –
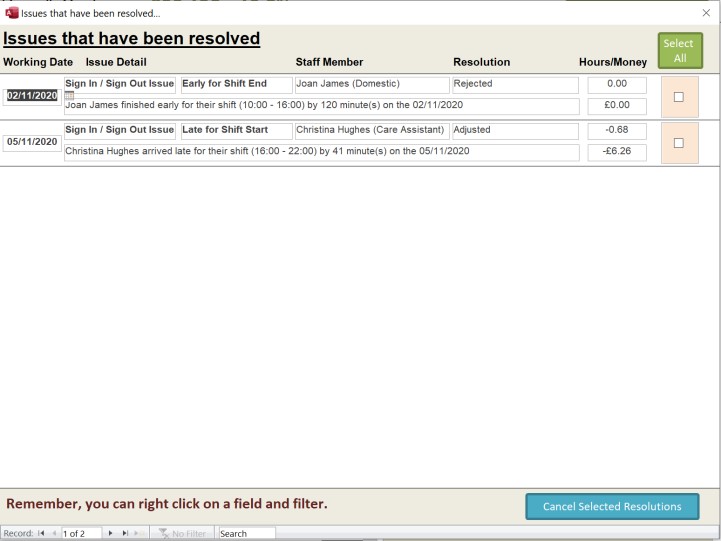
As you can see there are two issues detailed. One has been Rejected, and one has been Adjusted. At this stage you can right click and filter the list. You can select a Resolution and cancel them. Cancelling a Resolution will put the issue back into the Payroll System to be resolved again.
Exceptional Lines
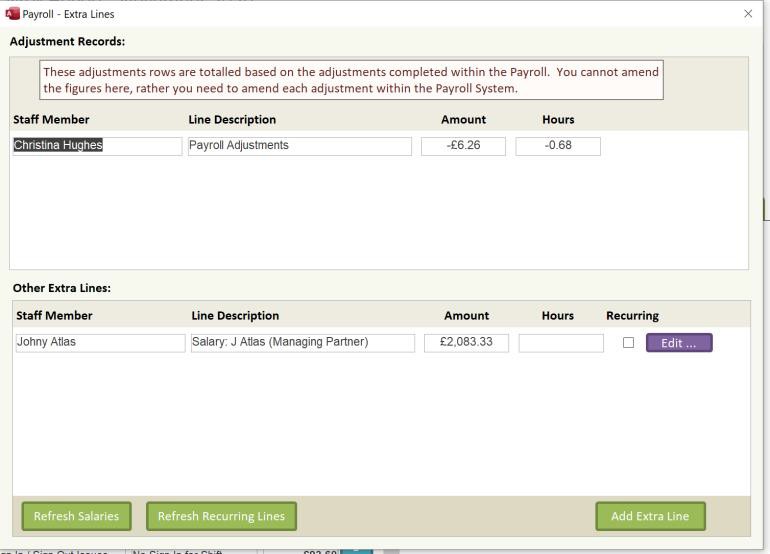
You can add Exceptional Lines to your payroll. These are viewable in the detail screen: –
Exceptional Lines can be made up of any manual entry. They also contain any adjustments made, rolled up by Staff Members. To view the Exceptional Lines just click the Green Button: –
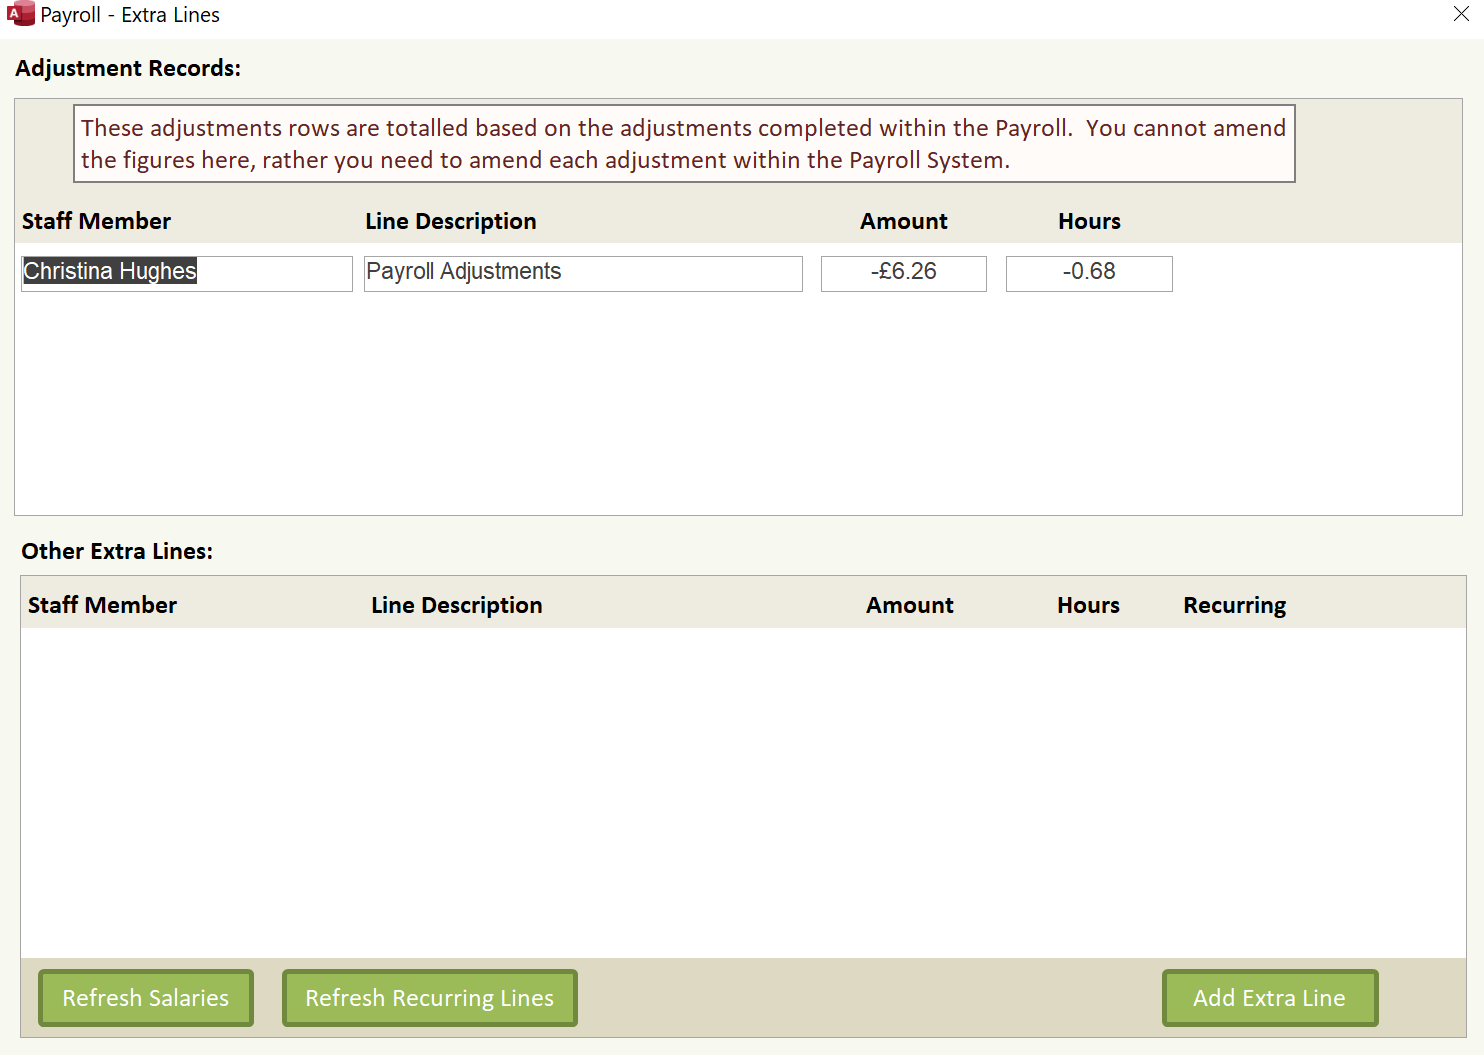
At the top you will see the Adjustments. These cannot be amended on this screen. These are rolled up to a staff member and will appear as adjusted hours on the final payroll output.
The bottom section contains any salary, recurring or single-entry lines.
Salary Entries
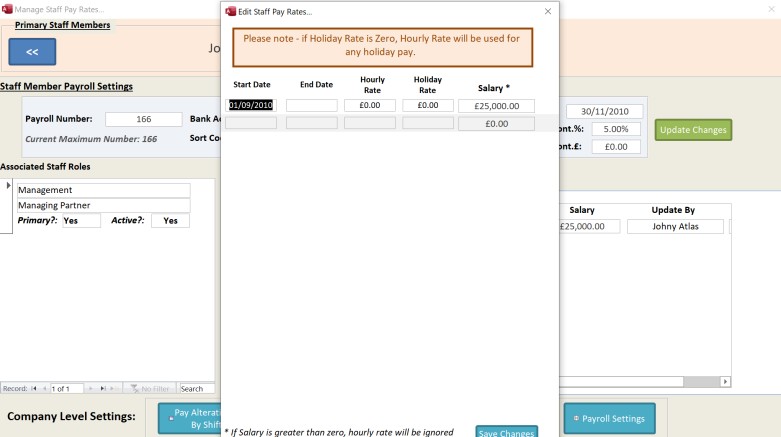
Salaries are maintained within the Manage Pay Rates Section. It is a very simple way of storing salary data by staff member. Any entry you place in here the system will automatically add the salary line the next time payroll is run: –
In this example we have set Johnny Atlas to have a yearly salary of £25,000 per year: –
When we load the payroll it now looks like this: –
When we go into the Exceptional Lines we will see the following: –
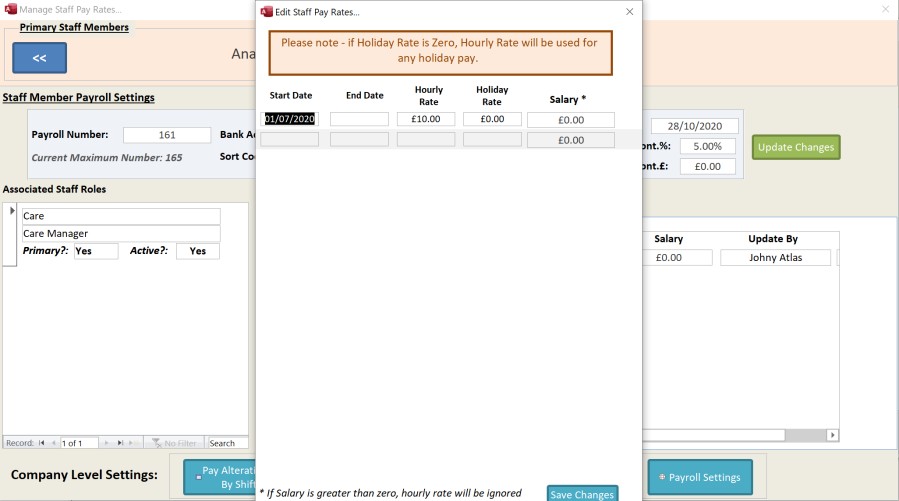
We can amend the salary line by clicking the Edit Button: –

Recurring Entries
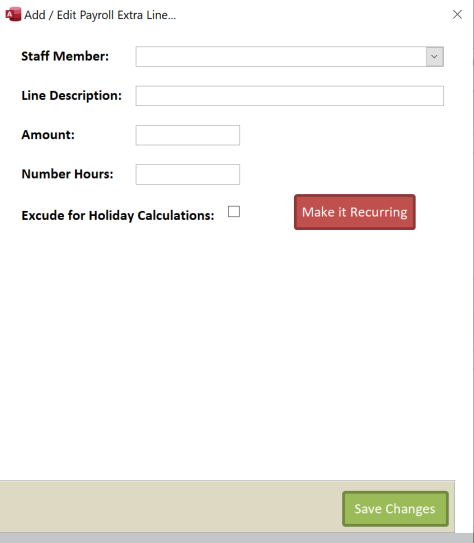
You can create a Recurring Entry from this screen. When you Add an Extra Line the screen looks as follows: –
An example could be that a staff member has borrowed £1,000 and wants to repay this at
£100 per month. The recurring entry would look like this: –

Here we have set the target entries to five (for £500), four is the number remaining as the first repayment is happening now.
This will then appear as a separate line with the Recurring flag set: –
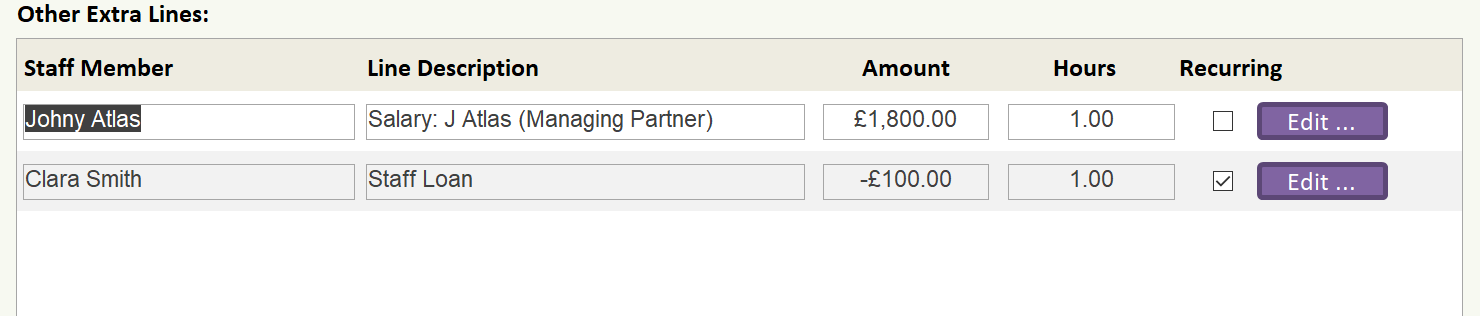
Each time you finalise your payroll the number of recurring entries is decremented by one.