- Summary
- Accessing Complaints
- The Complaint Summary screen
- The View/ Edit Complaint screen
- Adding a Note
- Adding a Document
- Printing a Complaint
- Adding a new Complaint
Summary
Although a Complaint is often seen as a negative thing, it is also a way to record and track something that is wrong, through to having it fixed.
Complaints functionality has been added to CC Windows; in this first release, a Complaint is a way to capture some feedback, from someone inside or outside the organisation, what or who it is about, and add Documents and Notes detailing what is being done to address any problems described. You can view the history of changes as a Complaint progress through to a “Closed” status; in a later release, we will be adding alerts features, too.
Accessing Complaints
You will find the new Complaints feature under “Communication” on the Main Administration screen:
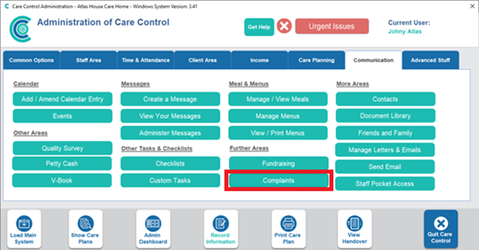
Fig 1. The Main Administration screen, showing the Complaints button
The Complaint Summary screen
The first Complaints screen is a simple Complaints Summary – a list of currently-open items, (you can include all entries, open and closed, by unticking the “Show Open Complaints Only?” tick-box at the bottom of the screen.
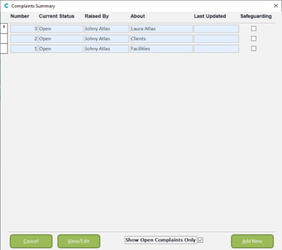
Fig 2. The Complaints Summary screen
From here, you can add a new Complaint using “Add New”, or view the detail and history of a Complaint, either by double-clicking in any field, or clicking a field and then clicking the “View/Edit” button.
The View/ Edit Complaint screen
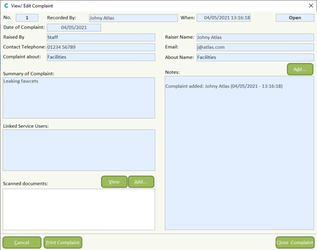
Fig 3. The View/ Edit Complaint screen
Here is an example of a simple Complaint, showing the updates made along with who made them and when date/time in the Notes field. Currently we can see that it has not been touched beyond the fact of the Complaint being added: this Complaint is about the facilities of the home; there are no Documents associated with this Complaint; no service users linked to it; and no other Notes have been added.
Note that, once saved, you cannot delete a Complaint, only close it. The “Cancel” button on this screen just takes you back to the previous screen, it does not cancel the Complaint,
Note too that you cannot edit many of the details of a saved Complaint – who or what the Complaint is about, the Summary details, contact details, linked Service Users, and so on.
However, once a Complaint has been saved, you can add one or more Notes by clicking the “Add…” button at the top of the Notes field:

Fig 4. Adding a Note from the View/ Edit screen
Adding a Note
In the resulting Add Complaint Note screen, you can add as much detail as you need to – including anything that might have been missing from the initial Complaint Summary. You can also check your spelling, which uses the same spellcheck screen available elsewhere in the app.
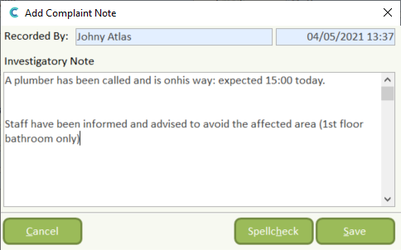
Fig 5. The Add Complaint Note screen
On clicking Save, the new Note will be added at the top of the Notes field, along with who wrote it and when:
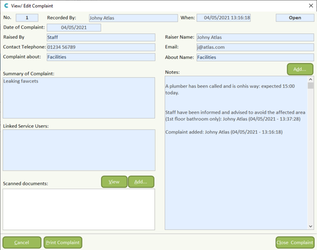
Fig 6. A note Added to the View/ Edit screen
Adding a Document
You can also add Documents, using the screens/ features with which you will be familiar from elsewhere in the application:
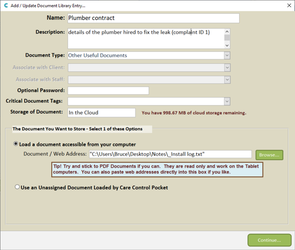
Fig 7. Add Document screen
Here, we are adding paperwork associated with the contractor who will be fixing the facilities problem.
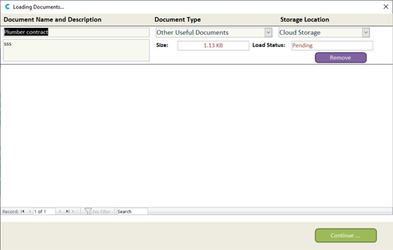
Fig 8. Upload Document screen
This screen shows you all the “queued” documents awaiting upload – for Complaints, this is handled one at a time.
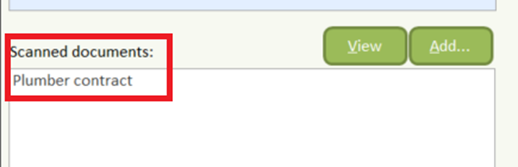
Fig 9. A New Document added to the View/ Edit screen
…and once uploaded, the Scanned Documents pane shows the name of each uploaded/ linked Document associated with this Complaint.
Note that Notes and Documents, once saved, are written to the Complaints record automatically – you do not need to save the Complaint again.
Printing a Complaint
You can print a Complaint from the View/ Edit screen: Notes, Document names and all Complaint details are then output to file or printer, as you prefer:
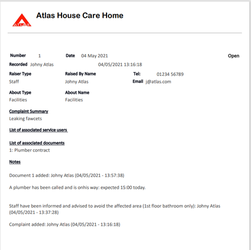
Fig 10. A printed Complaint
Adding a new Complaint
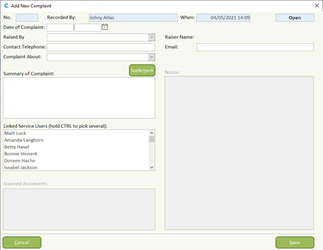
Fig 11. The Add New Complaint screen
To add a new Complaint, click the “Add New” button from the Complaint Summary screen.
Here, you will need to enter at least a minimum of information before you will be able to save your record:
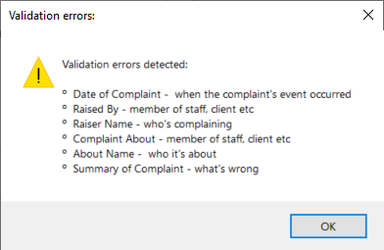
Fig 12. Incomplete data and validation errors
Note that if the Complaint is about a Client (i.e., a Service User), you should select them from the “Linked Service Users” list.
Of course, the Complaint may affect multiple areas and involved multiple people – you can select multiple Service Users, by holding down the CTRL key and clicking them; hold down CTRL and click again to deselect. You can also use this list to link Service Users to a Complaint which is primarily about something else e.g., Facilities.
Note that you cannot add a Note or a Document to the Complaint until you have first saved it – you will then be taken to the View/ Edit screen where those buttons and features are available.
Further validation exists on the e-mail field, mirroring that used elsewhere in the app: an e-mail address has to be in the form AAA@BBB.CCC.
Note that top-level domain names greater than three characters e.g., .google, are not currently supported