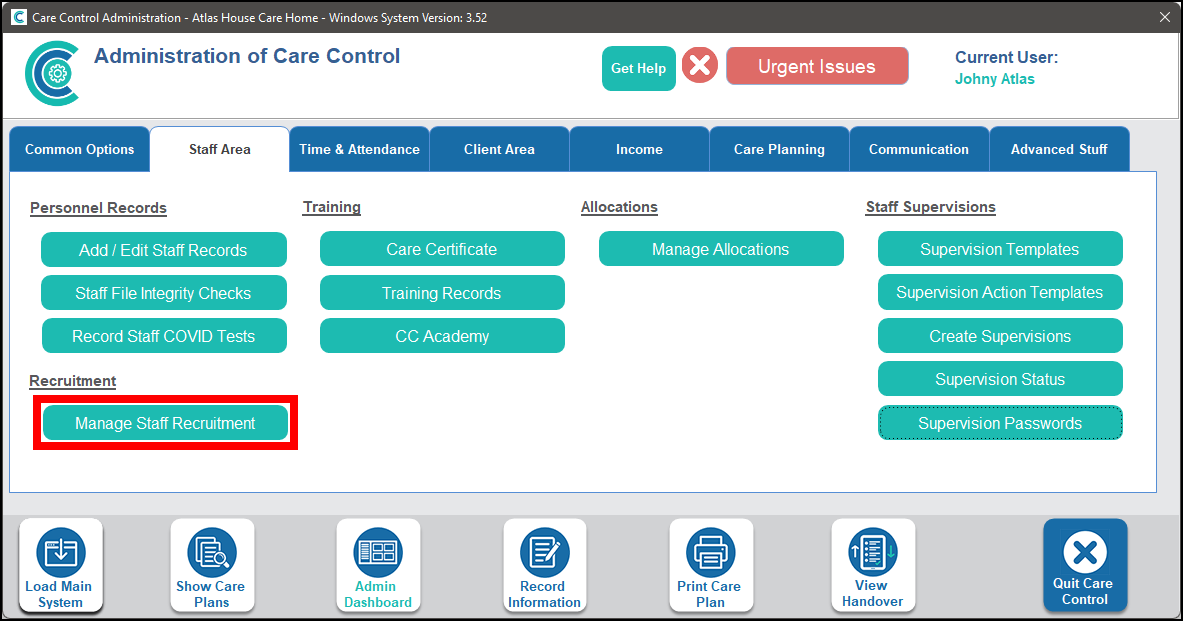
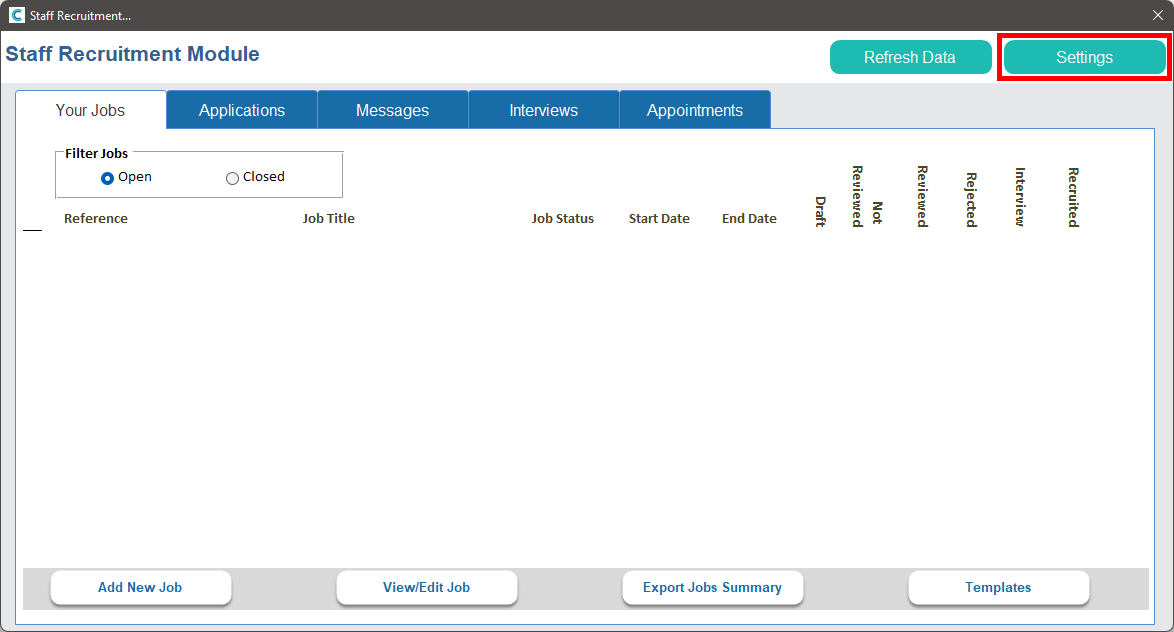
On CC Windows you can find the Recruitment area on the Staff Area tab of the main Administration screen.

When you first open the Recruitment area you will activate a trial period. After seven days the trial will end and the area will be set as On and any fees may be added to your current invoice, if the Recruitment Module is not included in your package. The status of your trial period can be viewed in the Recruitment Settings.
Recruitment Settings
You can access the Recruitment Settings from the main Recruitment hub. We advise ensuring these are set up correctly before you start using this area.

At the top of the Settings page you will see these options.

- Switched On: This is the current status of the Recruitment area. You can also see when the area was switched on and who activated it.
- Default Industry: This will be the type of service you provide. This will be used by applicants for filtering purposes.
- Default Interview Duration: This is the usual length you anticipate interviews to be. This can be overwritten when creating interviews if needed.
- Review Time: This is the number of minutes required for reviewing or refreshing between interviews.
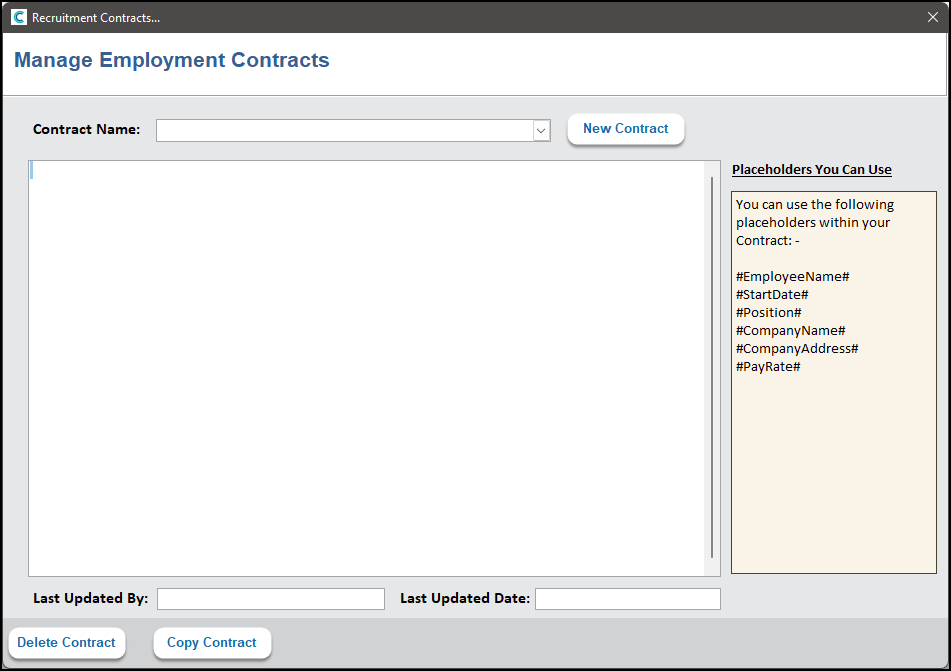
The Add/Amend Contracts button will open the Contract Management window.

This area is for adding Contracts to the system. These do not need to be specific to the person being recruited so we have added placeholders for you to use throughout the contract template (listed in the box on the right). These placeholders will be placed with the appropriate information later.
To add a new contract, click New Contract. You will be asked to enter a name for the contract. You can then start writing the contract into the box provided or paste it from another location. We have added an example contract for you to view/edit.
If you want to view or edit a previously created contract you can select it from the dropdown menu.
Clicking Copy Contract will allow you to copy the contract to your computer’s clipboard for pasting into another program, email etc.
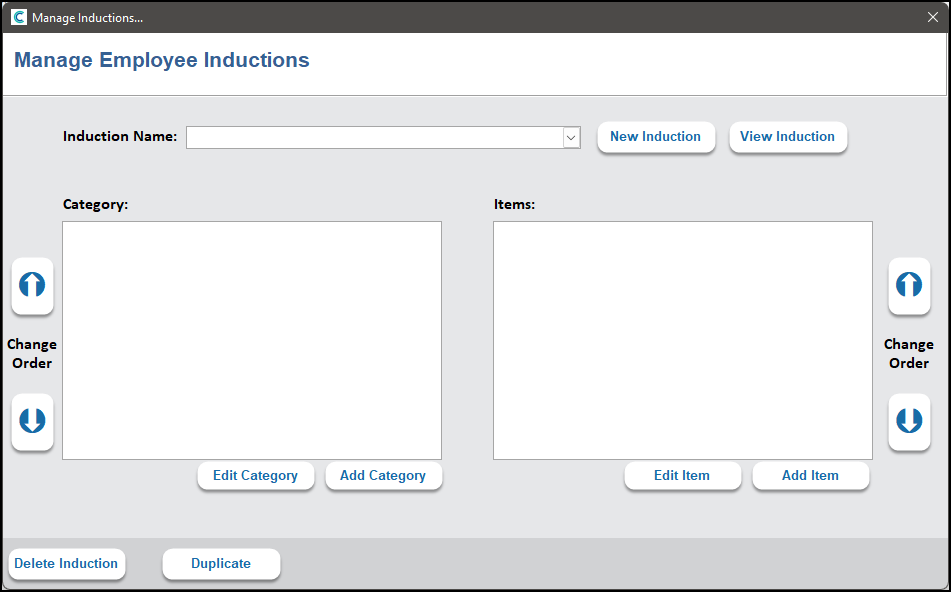
Back in the Settings, if you click on the Add/Amend Inductions button you will open the Induction Management window.
Here you can edit or add new Inductions. To add a new Induction click New Induction and enter a distinctive name. To edit an existing Induction select it from the dropdown menu.
Each Induction is made up of one or more categories, and each category can have one or more items for the new staff member to complete. To add a new category click on Add Category. This will open another window.
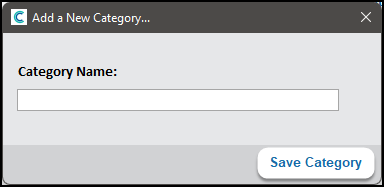
Enter the name of the category and click Save Category.
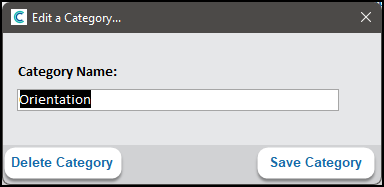
To edit a category click Edit Category. From here you can update the category name or delete it from the Induction.
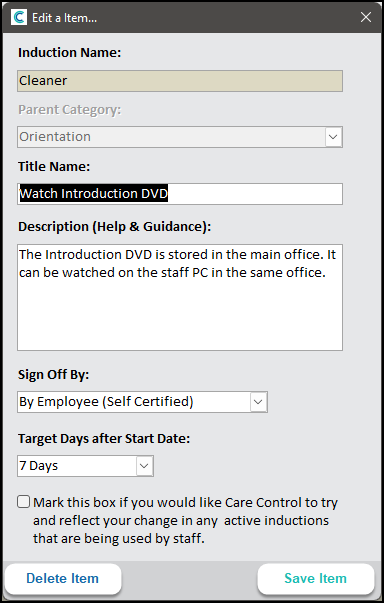
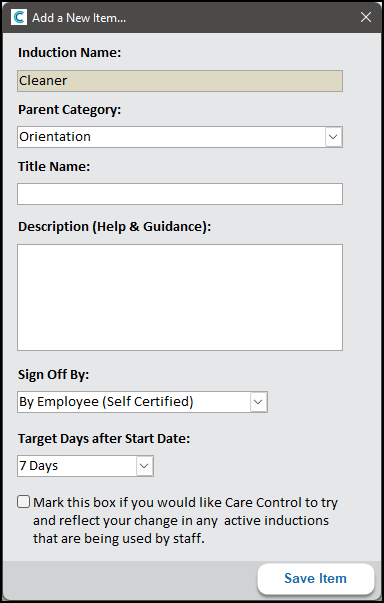
To add an Item to a category click Add Item. This will open the window below.

You can select the category the item will belong to, the title name of the item, a description of what is required in order for the item to be completed, who can sign to say that the item has been completed and the target number of days for the item to be completed.
Click Save Item to add the item to the Induction.
Clicking Edit Item will open the screen below.
You can make any changes to the item or, if necessary, delete the item from the Induction.
We have also added the ability to change the order of categories and the items within them. This will allow you to make sure the first tasks to be completed appear higher in the Induction screen on CC Pocket.
Back to the Settings page, below the first settings is the Application Form Mandatory Sections & Fields area.
These are all of the areas which will can potentially be added to an application form (each job posting can have different fields – this will be explained later in the Adding A Job section). To change whether the field is displayed for applicants or whether the field is mandatory, double-click the field in the list. You will have access to the edit options.
Here you can edit the name (this will be displayed on the application form), whether it is switched on (displayed) and, if it is displayed, whether the field is mandatory. Click Update to update the settings.
Below the Application Form Mandatory Sections & Fields section are the Default Attachment Settings.
Here you can set which attachments, by default, are requested and required from applicants. You can add new attachments, edit existing ones or remove one if necessary.
Below this is the Application Form Declaration Message.
This is the message that will be displayed to applicants when then submit their applications. You can edit this to give a more personalised message from your service.
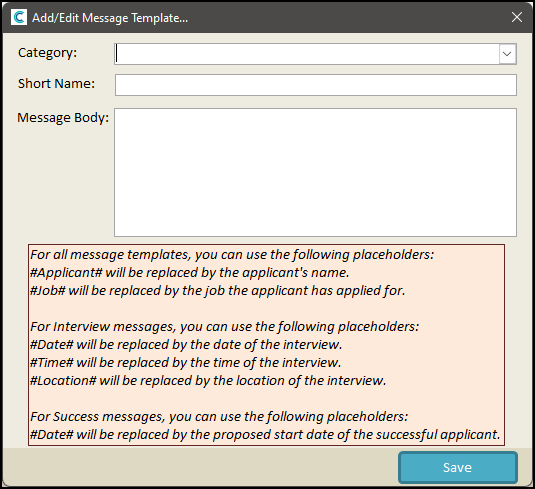
Next are the Message Templates.
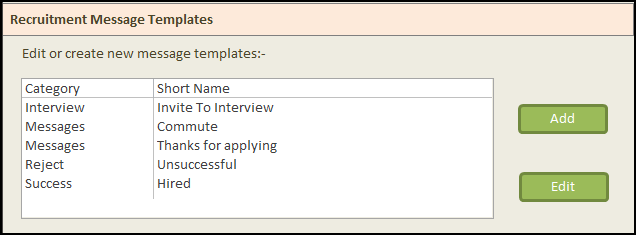
These can be used to send messages to applicants quickly. You can edit the defaults we have added for you or add new options.

There are several categories to choose from:
- Interview: these templates can be used when creating an Interview for an applicant.
- Messages: these templates can be used when sending messages through the main Message area.
- Reject: these templates can be used when rejecting applicants.
- Success: this template is used for successful applicants. We advise only having one template for this.
You can also use placeholders in the message templates. These will be replaced by the relevant information.
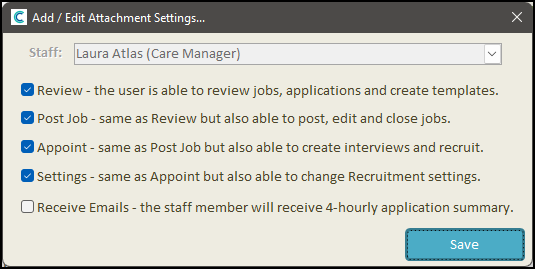
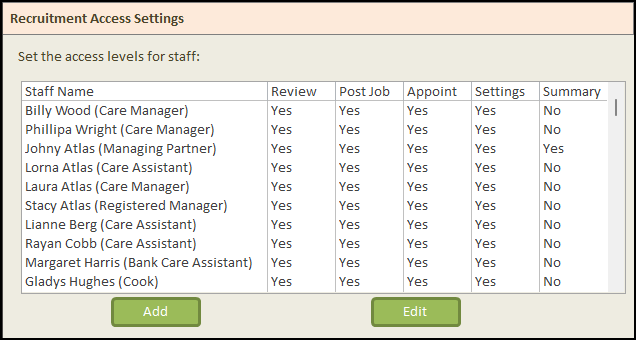
Back to the Settings page, the final section is for Access Settings.

These settings determine how much of the system can be used by staff. Only staff with administrative rights will appear in this list (since the Recruitment area is only accessible through the Administration Area of CC Windows).
Clicking Add will allow you to grant access to Recruitment area, whilst Edit will allow you to change the access level a staff member already has.
The Add/Edit screen describes what each level of access gives.
Adding A Job
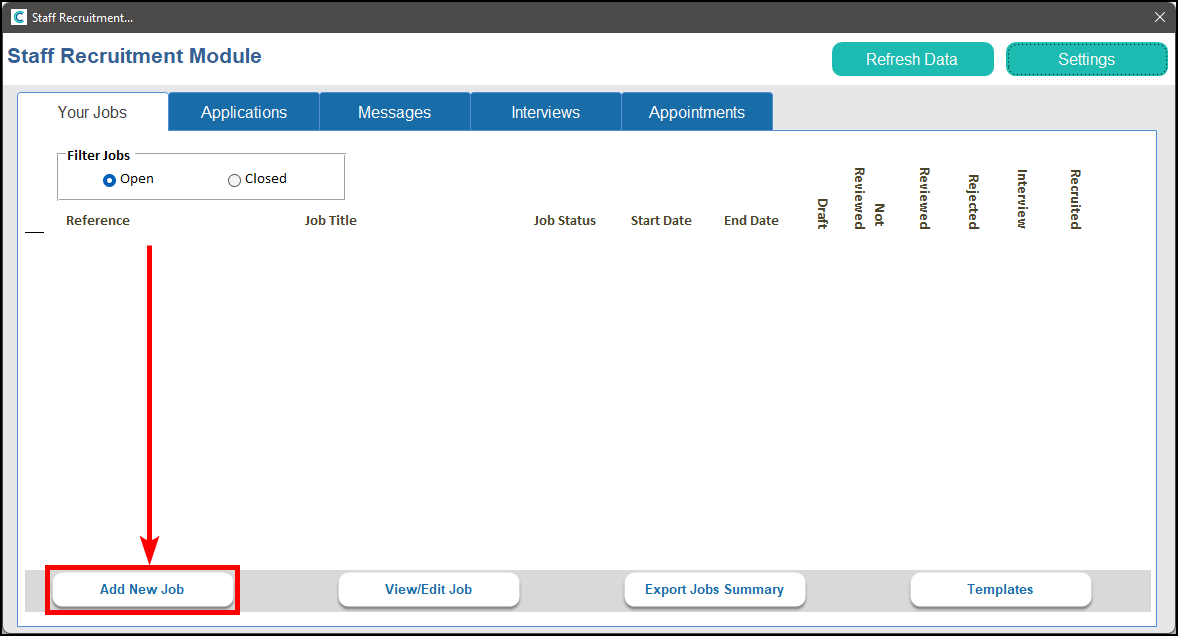
To add a job, click Add New Job in the Recruitment hub.

The Add Job page will open.

Looking at the first section, you can use a template (we have added an example template for you), enter a unique reference (this is required to distinguish each job posting from the others) and the job title.
You can then fill out the rest of the information for the job posting. If you are using a template it is advised that you review the information to make sure it lines up with the job you are advertised (number of hours, pay information etc.).
Towards the bottom of the page are sections for attachments and available fields. These will initially load with the default settings but can be amending for the specific job posting. Adding, editing and removing these works the same as in the Settings (see above for details).

At the bottom of the screen you will have two options (depending on your access level). The first is Save as Template which will add the job details you have entered. The second (if you have access higher than Review) will be to Add Job. Clicking this will save the job details and post the job advert to www.FindMeACareJob.co.uk.

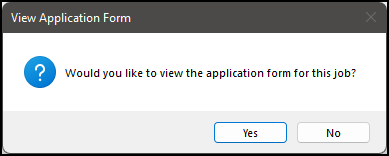
Once the job has been posted you will be given the option to view the application form. This will allow you to make sure that it displays and behaves as you’d like it to.
The Add Job page will also reload in an edit mode, allowing you to update the job advert with any changes you want to make. This will be highlighted by the title of the page changing to Update a Job.
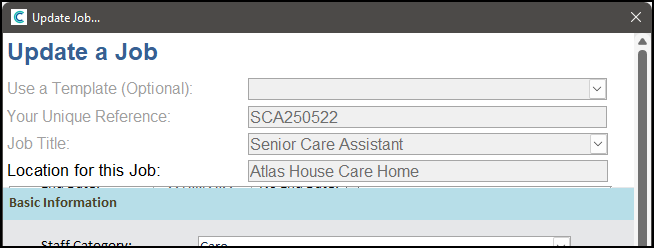
While in edit mode, you can update the job advert using the Update Job button, Save as Template as before, delete the job using Delete Job (this will display as Close Job if applications have already been received for the job) and copy the link for the application for (for pasting into emails, onto a website etc.) by using Copy Application Link to Clipboard.

Recruitment Hub
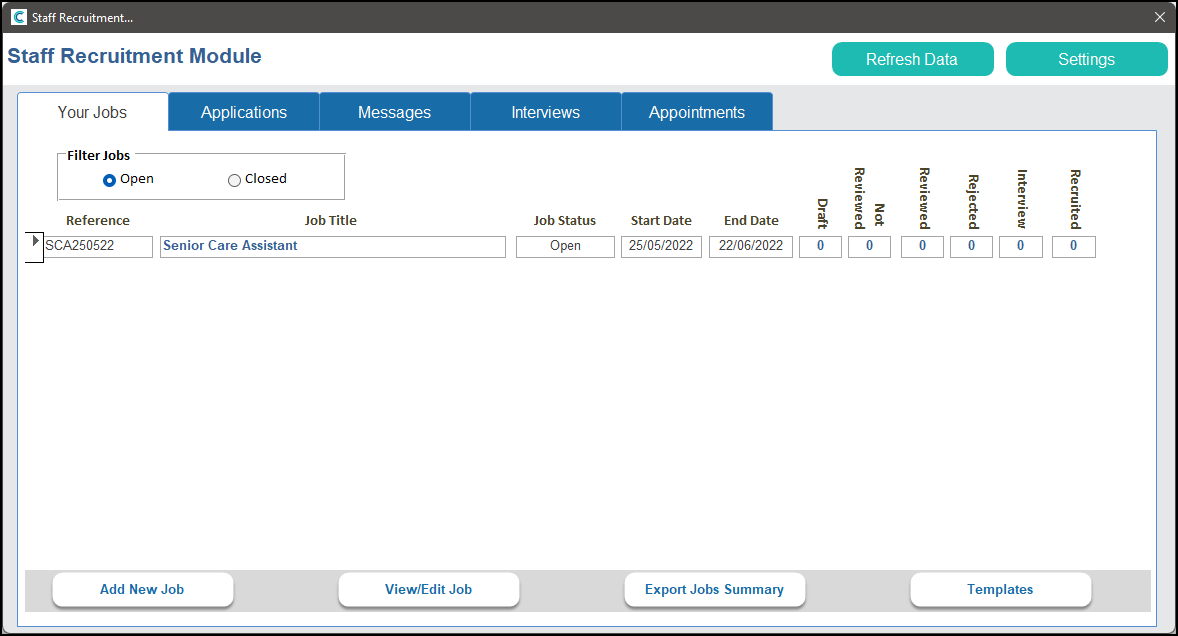
The main area in the Recruitment area gives you a lot of visibility on the status of job adverts, applications received, messages to and from applicants, interviews and new staff workflows. The first tab, Your Jobs, gives you information on the job adverts.

Clicking Export Jobs Summary will export all data from this screen to an Excel/spreadsheet program. Templates will open a list of existing templates, allowing you to start creating a new job advert using a template or deleting a template. Clicking on a posted job’s title will load the Applications tab showing only applications for that job. Clicking on any of the numbered statistics to the right will load the Applications tab showing only applications for that job with the selected status.

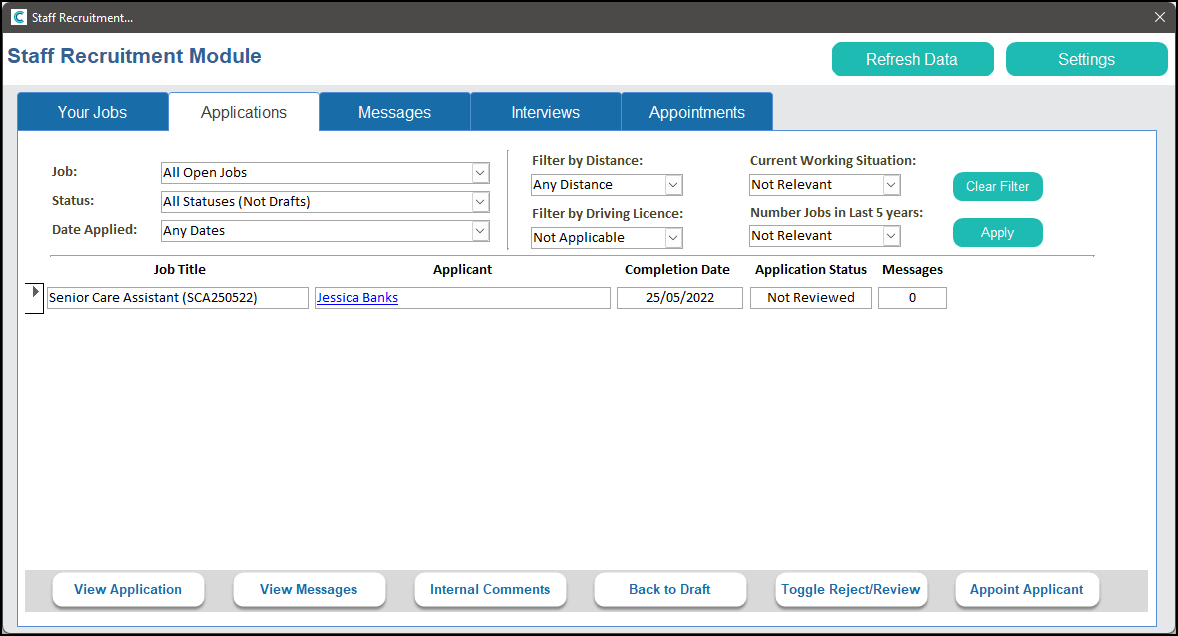
The Applications tab shows summarised data for the applications received.

You can use the filters along the top to narrow down what you are looking for.
Clicking View Application will open the application form in a read-only view in your browser. Clicking on the applicant’s name will also do this. While viewing the application form you can also access the messaging system, view any attachments and print the form.

View Messages will open the messaging page. Here you can view all messages that have been received from and sent to the applicant. If there are unread messages from the applicant that this will be displayed to the right of the applicant’s record. Clicking on this will also load the messaging page.

Internal Comments will load a page which shows any comments made about the application internally. These comments are never shared with the applicant and can only be viewed from within the Recruitment area.
Back to Draft will set an application form with the status Reviewed back to draft. This is useful for if you require additional information from the applicant before an interview is arranged.
Toggle Reject/Review allows you to quickly reject applications which have the status Reviewed without having to send a message, or to set the status to Reviewed if the application was set to Rejected by accident. If the application has the status of Interview then you will be required to enter a reason for the rejection. You can choose to have this sent to the applicant as a message.
Appoint Applicant will allow you to process an applicant’s details and add them to the staff list. The application’s status must be Reviewed or Interview for this to work.
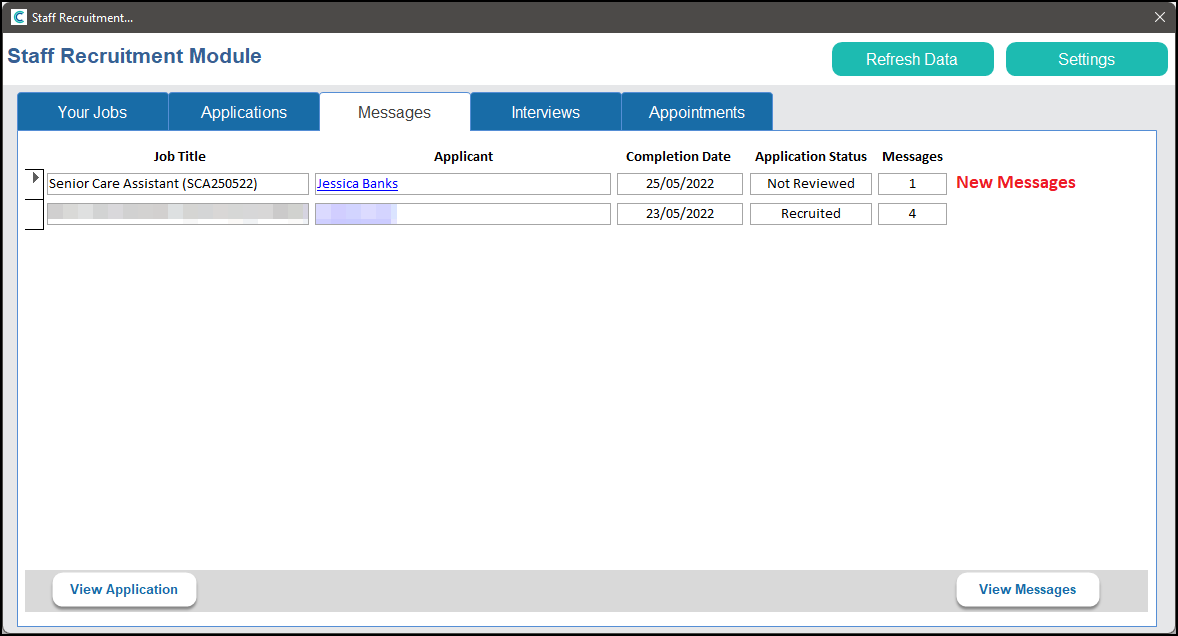
The Messages tab will show you similar data to the Applications tab, however only applicant’s who have sent or received messages will show here. Any applicants with new messages will appear at the top.

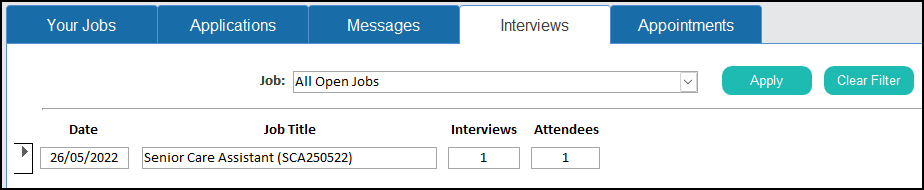
The Interviews tab will show a summary of any interviews for all open jobs (closed jobs can be viewed by selecting them from the dropdown list).
Clicking on Create/Edit Interview will allow you to manage new and existing interviews.
The Appointments tab will give a summary of how new staff are progressing with their initial workflows. We will look at this in detail later.
Messaging
You can access the messaging system from a number of areas within the Recruitment area. The messaging page looks like this.
As with other messaging systems, the messages are ordered from oldest to newest, however the page will load showing the newest messages. The page will check if more messages have been received every few seconds and will load them for you if there are any.
You can use the Message Templates to prepopulate the New Message box. It will automatically add the relevant information for the applicant.
Once you are happy you can send your message by clicking Send Message.
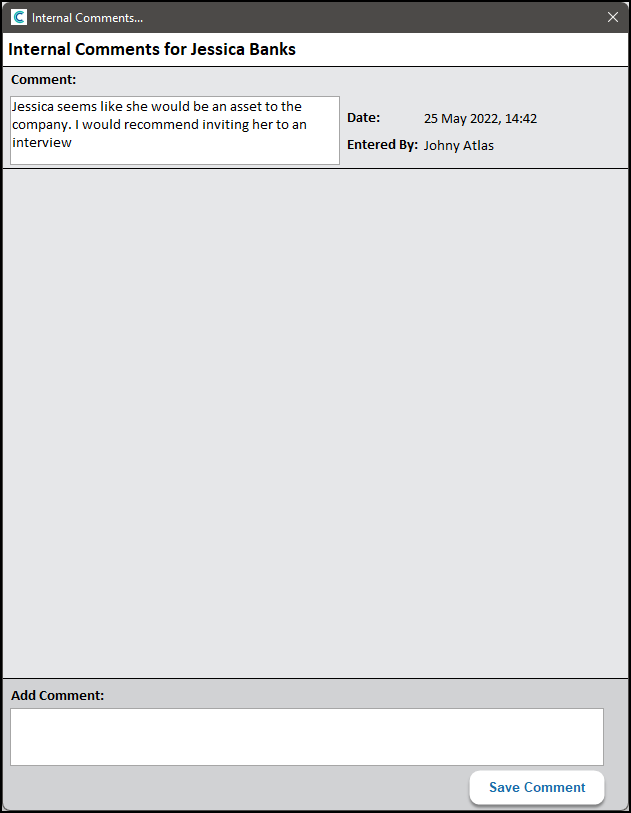
Internal Comments
This page will allow you to view any comments about the applicant/application. You can also add new comments here.

Creating and Cancelling Interviews
From the Interviews tab we can create and edit interviews.

The Organise Interviews page will open.

To create an interview you will need to:
- Select the job from the dropdown list.
- Select the applicant from the list on the left. Only applicants who have a status of Reviewed can have interviews created for them.
- Choose the date of the interview.
- Enter the start time.
- Make sure the planned duration is correct – this can be changed at this point if necessary.
- Select a location for the interview from the dropdown list or enter a new one. This can be an URL for an online meeting.
- Enter a message to send to the applicant. You can use message templates for this.

Clicking Create Interview will create an interview for the applicant and send a them a message.
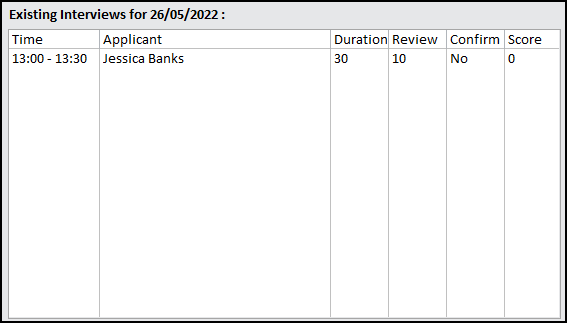
If the times for the interview overlap with another, a message will appear to say that the interview could not be created. To assist with this, a list of all interviews for the date selected will be shown on the right. Please note that an interview is considered as overlapping if it is within the time shown in the first column or within the time afterwards set aside for reviewing.

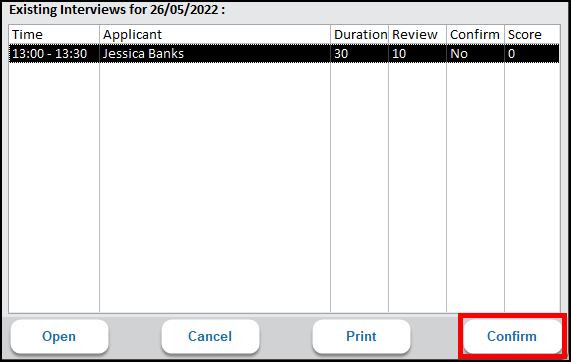
You can choose to confirm and interview when the applicant agrees to the time and date of the interview. To confirm, select the interview record and click Confirm.

If the applicant cannot make the interview, or you need to re-organise for some reason, you can cancel the interview by clicking Cancel.
The Interviews tab will be updated with the interviews you create.

Participating in Interviews
If you are participating in an interview then there are a couple of options for you.
- Recording interview notes in CC Windows
From the Organise Interviews page you can select the interview record and click Open.
In here you can view the applicant’s contact information, the duration of the interview, any comments added by anybody in the interview (these are refreshed every few seconds) and any scores which have been recorded.
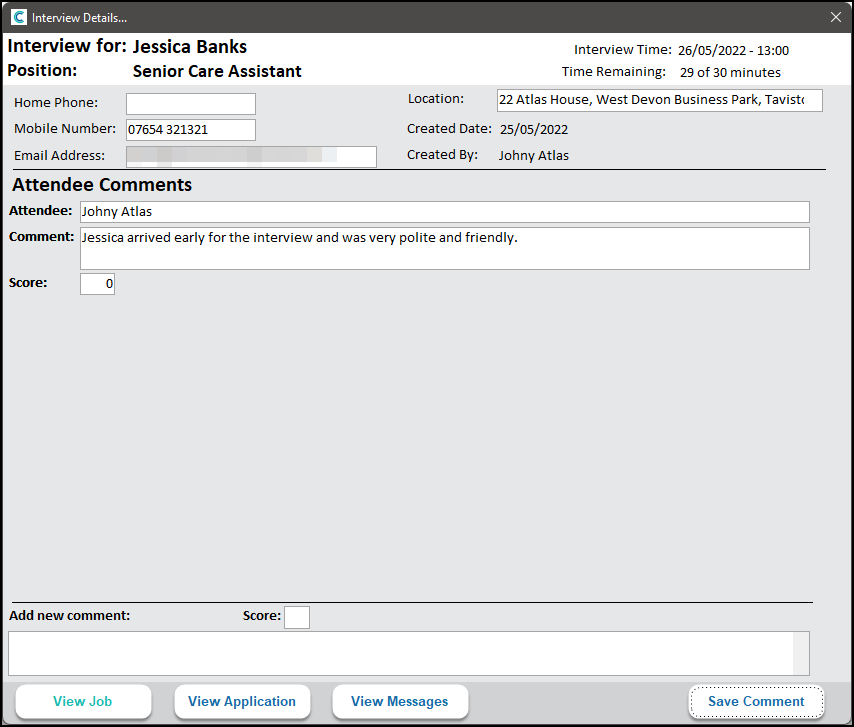
For ease of access, you can also open the job description, the interviewee’s application form and any messages that have been sent to or received from the applicant.
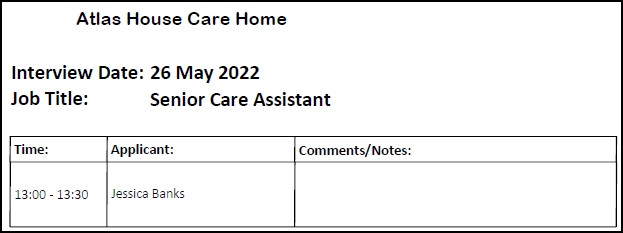
- Print a note sheet
We have added the option for you to print a note sheet for the day’s interviews. You can use this by clicking Print in the Organise Interviews page.

Appointing Applicant
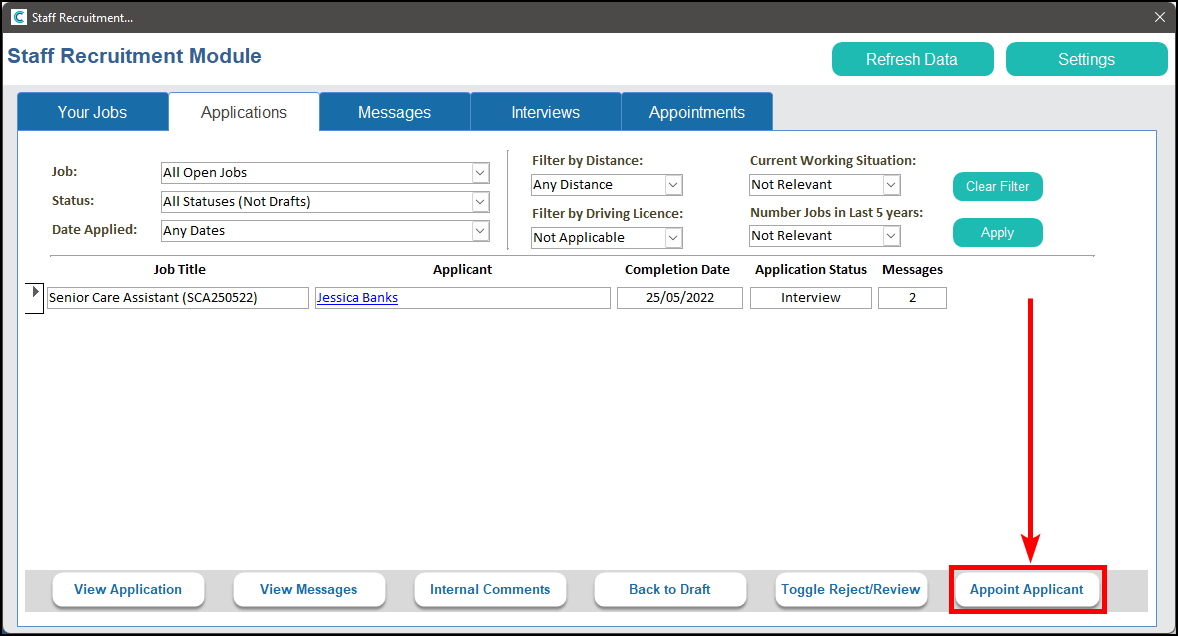
Following a successful interview you will want to add the applicant to your staff. We have made this easier for you as most of the information you need will be included in either the job advert or the application form. To appoint an applicant, click on Appoint Applicant on the Applications tab.
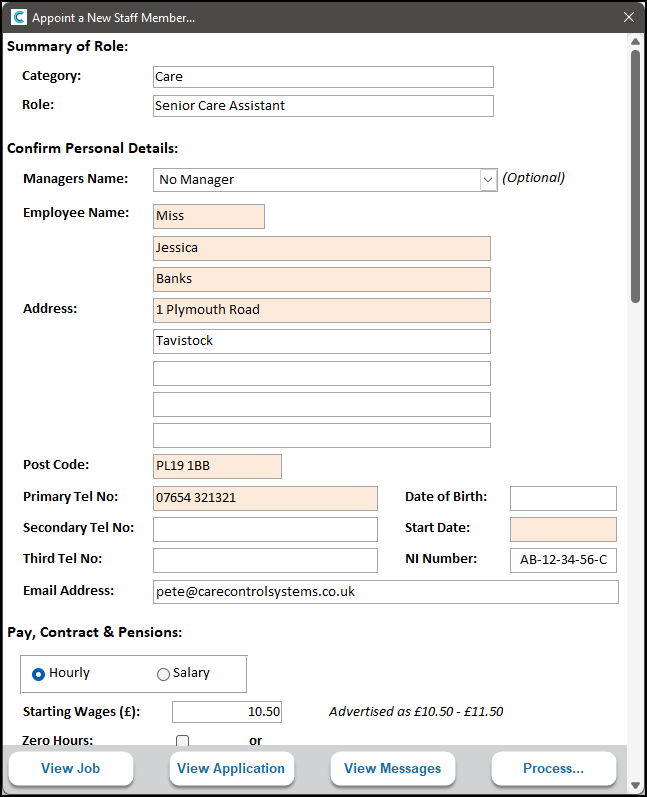
The Appoint a New Staff Member page will load.

It is advised that you revise all of the information on the page. Fields which are required are the Start Date and the permissions the new staff member will have. If you do not enter a Date of Birth then a pseudo date will be added for you – this is 01/01/2000.
To make this easier, we have added links to the job description, the application form and messages.
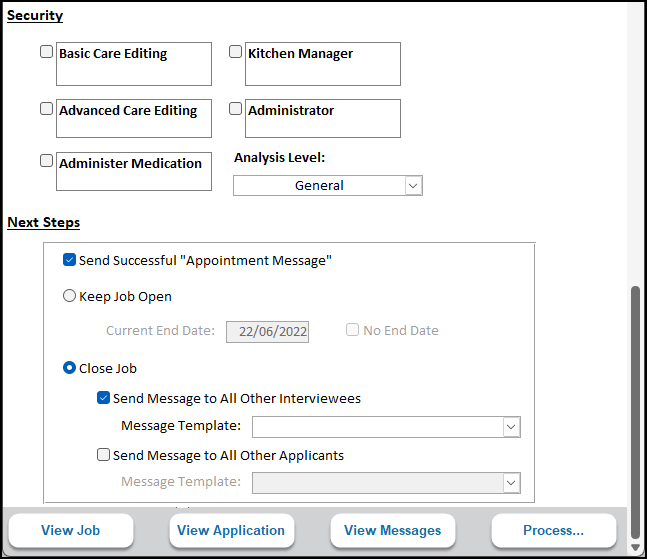
At the bottom of the page you have some additional options.

The system will default to send a message to the successful applicant, though this can be switched off if necessary.
You can decide here whether to keep the job advert open or close it to further applications. If you keep the job open then you can amend the existing end date or set it to have no end date. If you decide to close the job then you will have options on whether to message other applicants and which message template is used to do so.
When you are ready to proceed, click Process… During this process the information entered will be added to a new staff record, the application form and any attachments will be added to the Document Library and linked to the new staff record, the reference information will be used to create new references within the staff record and an unique PIN will be generated.
Once this process is complete, the Appointment Workflow page will open.
Appointment Workflow
The Appointments tab in the Recruitment hub will look like this when you have new staff.

To access the Appointment Workflow for a staff member click Open Workflow.

Each workflow has up to seven steps which can each be switched on or off as needed. Please be aware that once a step has been started it cannot be switched off.
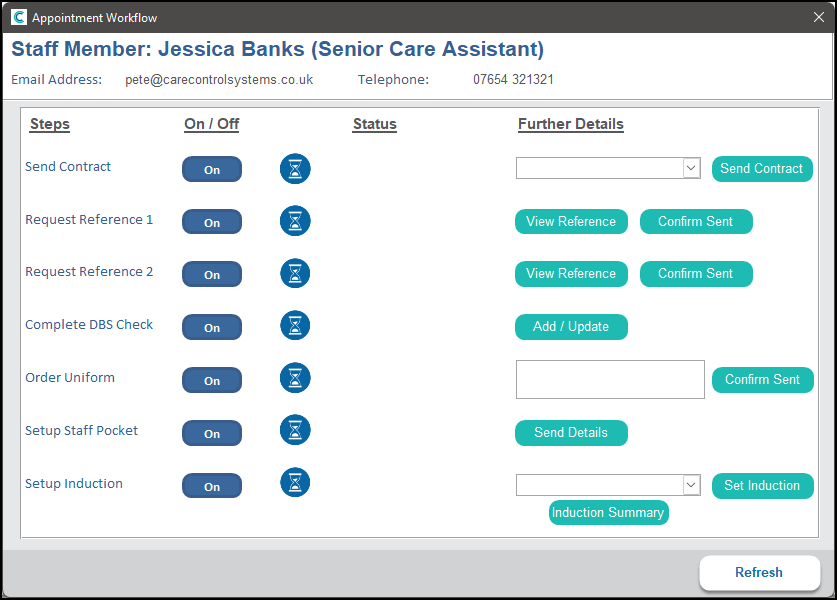
Here is how each step behaves:
- Contract
To send a contract to the new staff member, select the Contract from the dropdown list and click Send Contract. This will load the Merge Contract screen – this will take the selected contract and fill any placeholders with the staff member’s information.

Here you can change the email address that the contract is sent to and make any changes to the contract. Once you are happy with this, click Confirm Contract. The status of the step will then be set to Contract sent.

You can view the contract by clicking on View Contract. This will allow you to resend the contract if necessary.
Once the contract has been read by the staff member the status will become Contract Read. When the contract has been signed, the step will be completed and the contract can no longer be sent. A link to the contract will also be added to the staff member’s Document Library.

- Reference 1 and Reference 2
The reference records will have been populated already however initially there is nothing to say that the reference has been requested or received. To mark a reference as requested, click Confirm Sent.

The status will be updated to Reference sent.

To record a response from a reference, click View Reference. This will open the Reference window. Click Record Response on there.

Enter the referee’s response and click Update.
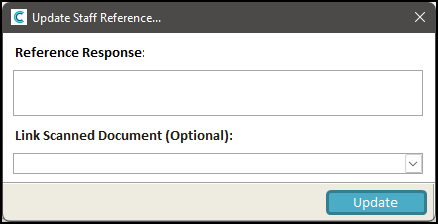
The Workflow will be updated to show that the response has been received.

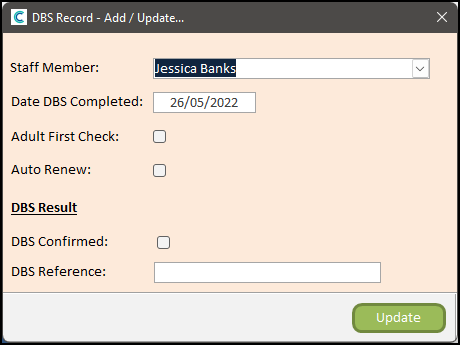
- DBS Check
You can record the DBS check for the new staff member.

Clicking Add/Update will open the DBS Update window.

If you do not mark that the DBS has been confirmed, clicking Update will set the DBS status as DBS Requested, marking that it is confirmed will set the status to DBS Received.

- Ordering Uniform
You can also track any uniform orders through the Workflow.

Enter a summary of what has been ordered into the text box provided and click Confirm Sent. The status will then be updated to Uniform Ordered and the text will be added to a note in the recruit’s Staff Record.

You can then update or replace the text and click Received once the uniform has been received.

- Setup Staff Pocket
We have made setting up new staff with staff-registered Pocket easier in the Workflow. When you click Send Details an email will be sent to the recruit with the Pocket code, their PIN and instructions on how to download the CC Pocket application.

Once the staff member has registered the CC Pocket application the status will be updated to Pocket Registered.

- Setup Induction
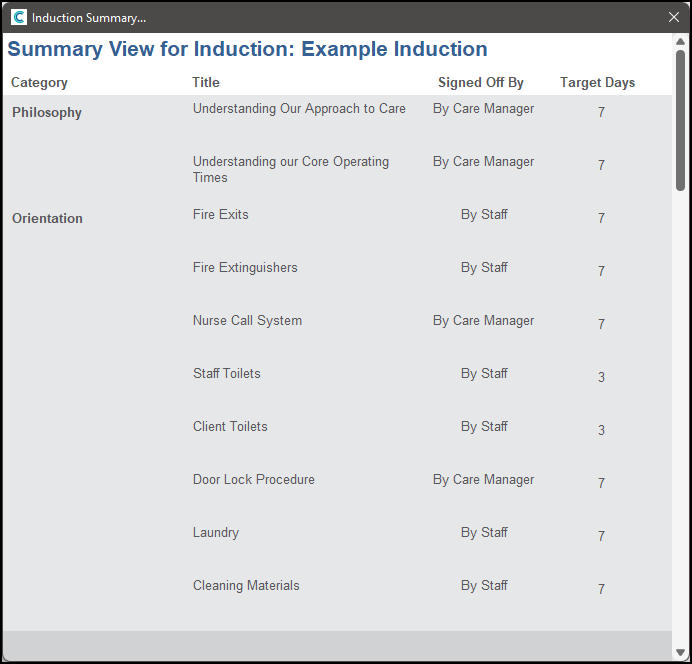
If you have created an Induction as mentioned above, you can select the Induction from the dropdown menu.

Before you set the Induction you can view what is included by clicking Induction Summary.

Clicking Set Induction will assign the Induction to the new staff member. They will be able to access this through CC Pocket.
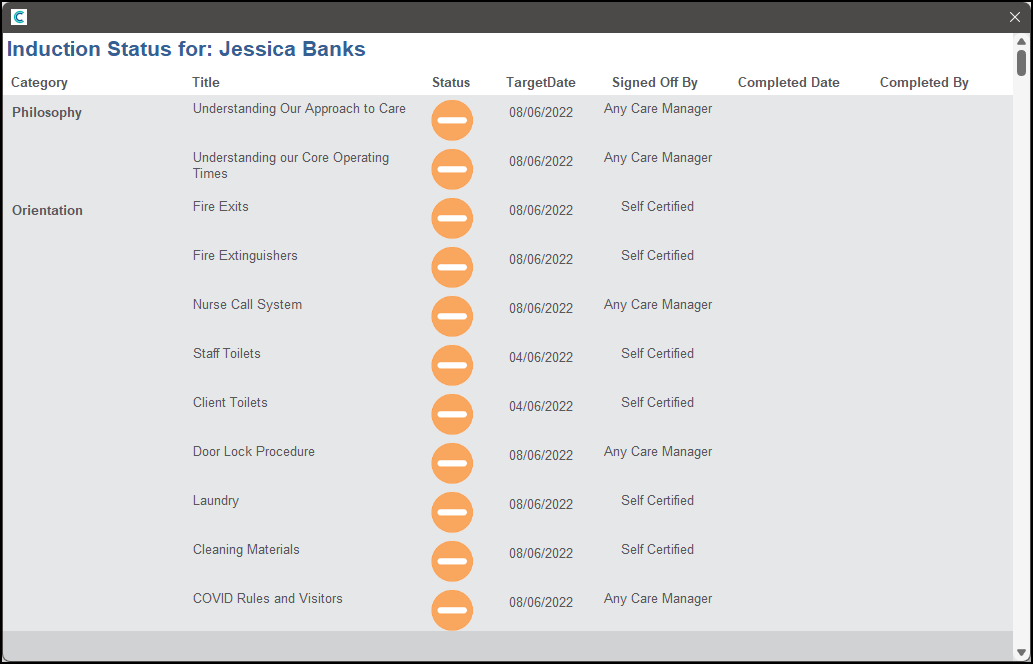
You will be able to keep track of their Induction progress by returning to the Workflow and clicking Induction Summary.


The Induction can also be access through the Staff Record.

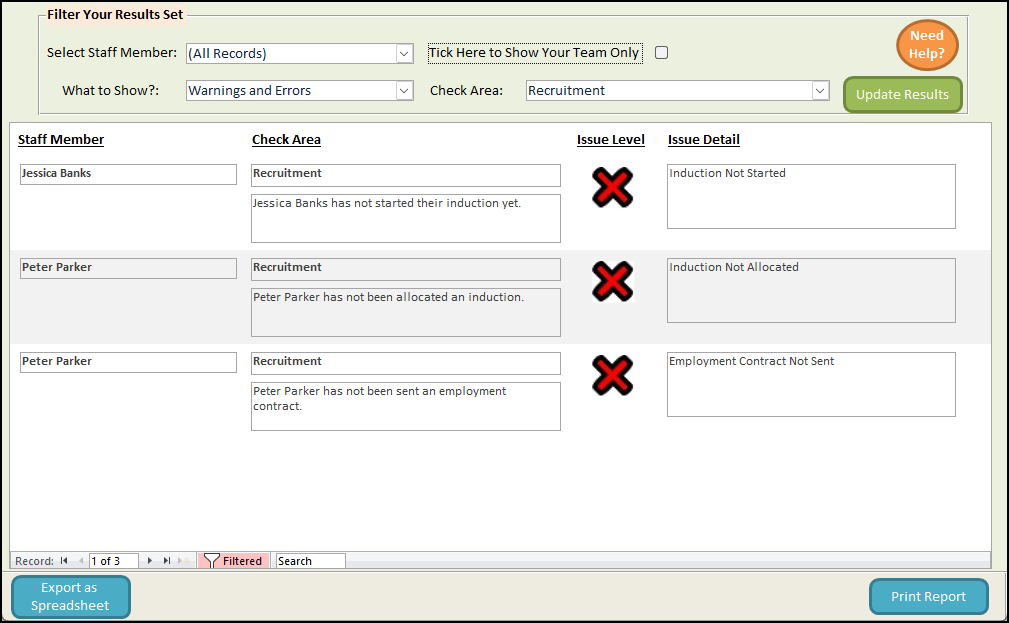
Staff Integrity Checks
As part of the Recruitment update we have added a few Staff File Integrity Checks to keep track of new staff Workflows.
Recruitment on CC Windows
On CC Windows you can find the Recruitment area on the Staff Area tab of the main Administration screen.
When you first open the Recruitment area you will activate a trial period. After seven days the trial will end and the area will be set as On and any fees may be added to your current invoice, if the Recruitment Module is not included in your package. The status of your trial period can be viewed in the Recruitment Settings.
Recruitment Settings
You can access the Recruitment Settings from the main Recruitment hub. We advise ensuring these are set up correctly before you start using this area.
At the top of the Settings page you will see these options.

- Switched On: This is the current status of the Recruitment area. You can also see when the area was switched on and who activated it.
- Default Industry: This will be the type of service you provide. This will be used by applicants for filtering purposes.
- Default Interview Duration: This is the usual length you anticipate interviews to be. This can be overwritten when creating interviews if needed.
- Review Time: This is the number of minutes required for reviewing or refreshing between interviews.
The Add/Amend Contracts button will open the Contract Management window.
This area is for adding Contracts to the system. These do not need to be specific to the person being recruited so we have added placeholders for you to use throughout the contract template (listed in the box on the right). These placeholders will be placed with the appropriate information later.
To add a new contract, click New Contract. You will be asked to enter a name for the contract. You can then start writing the contract into the box provided or paste it from another location. We have added an example contract for you to view/edit.
If you want to view or edit a previously created contract you can select it from the dropdown menu.
Clicking Copy Contract will allow you to copy the contract to your computer’s clipboard for pasting into another program, email etc.
Back in the Settings, if you click on the Add/Amend Inductions button you will open the Induction Management window.
Here you can edit or add new Inductions. To add a new Induction click New Induction and enter a distinctive name. To edit an existing Induction select it from the dropdown menu.
Each Induction is made up of one or more categories, and each category can have one or more items for the new staff member to complete. To add a new category click on Add Category. This will open another window.

Enter the name of the category and click Save Category.
To edit a category click Edit Category. From here you can update the category name or delete it from the Induction.

To add an Item to a category click Add Item. This will open the window below.
You can select the category the item will belong to, the title name of the item, a description of what is required in order for the item to be completed, who can sign to say that the item has been completed and the target number of days for the item to be completed.
Click Save Item to add the item to the Induction.
Clicking Edit Item will open the screen below.

You can make any changes to the item or, if necessary, delete the item from the Induction.
We have also added the ability to change the order of categories and the items within them. This will allow you to make sure the first tasks to be completed appear higher in the Induction screen on CC Pocket.
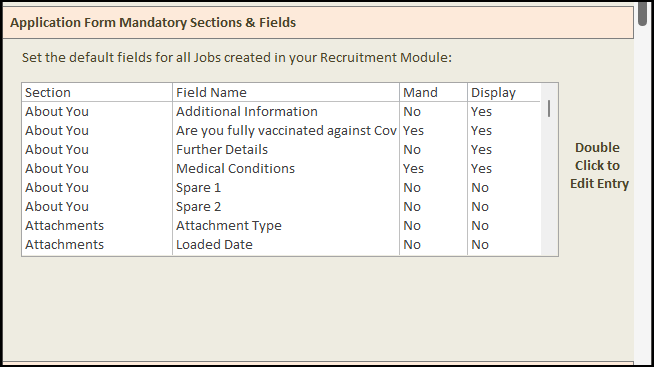
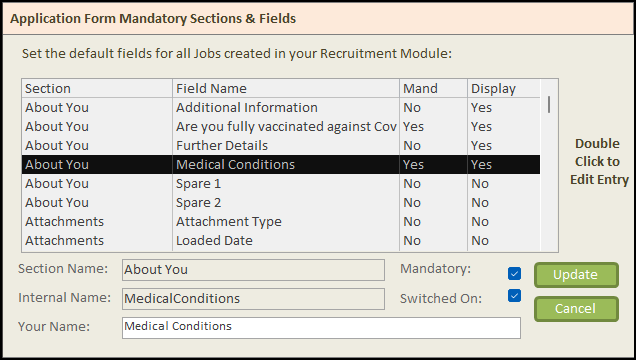
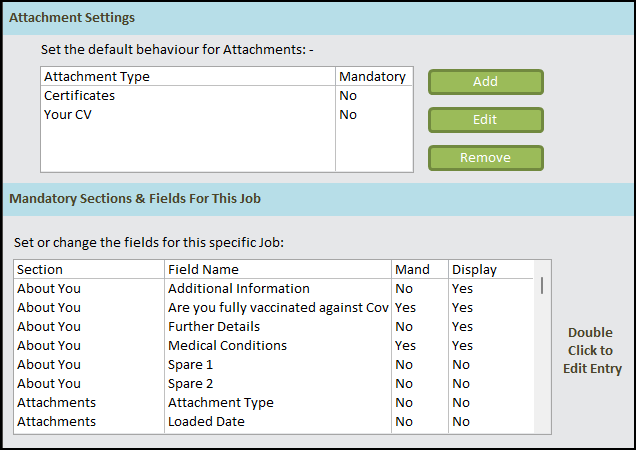
Back to the Settings page, below the first settings is the Application Form Mandatory Sections & Fields area.

These are all of the areas which will can potentially be added to an application form (each job posting can have different fields – this will be explained later in the Adding A Job section). To change whether the field is displayed for applicants or whether the field is mandatory, double-click the field in the list. You will have access to the edit options.

Here you can edit the name (this will be displayed on the application form), whether it is switched on (displayed) and, if it is displayed, whether the field is mandatory. Click Update to update the settings.
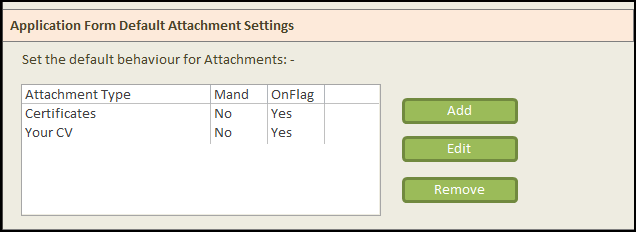
Below the Application Form Mandatory Sections & Fields section are the Default Attachment Settings.

Here you can set which attachments, by default, are requested and required from applicants. You can add new attachments, edit existing ones or remove one if necessary.
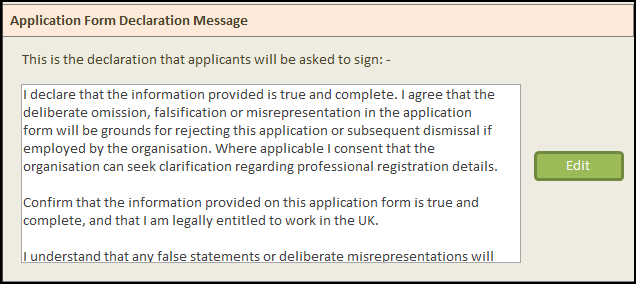
Below this is the Application Form Declaration Message.

This is the message that will be displayed to applicants when then submit their applications. You can edit this to give a more personalised message from your service.
Next are the Message Templates.

These can be used to send messages to applicants quickly. You can edit the defaults we have added for you or add new options.
There are several categories to choose from:
- Interview: these templates can be used when creating an Interview for an applicant.
- Messages: these templates can be used when sending messages through the main Message area.
- Reject: these templates can be used when rejecting applicants.
- Success: this template is used for successful applicants. We advise only having one template for this.
You can also use placeholders in the message templates. These will be replaced by the relevant information.
Back to the Settings page, the final section is for Access Settings.
These settings determine how much of the system can be used by staff. Only staff with administrative rights will appear in this list (since the Recruitment area is only accessible through the Administration Area of CC Windows).
Clicking Add will allow you to grant access to Recruitment area, whilst Edit will allow you to change the access level a staff member already has.
The Add/Edit screen describes what each level of access gives.

Adding A Job
To add a job, click Add New Job in the Recruitment hub.
The Add Job page will open.

Looking at the first section, you can use a template (we have added an example template for you), enter a unique reference (this is required to distinguish each job posting from the others) and the job title.
You can then fill out the rest of the information for the job posting. If you are using a template it is advised that you review the information to make sure it lines up with the job you are advertised (number of hours, pay information etc.).
Towards the bottom of the page are sections for attachments and available fields. These will initially load with the default settings but can be amending for the specific job posting. Adding, editing and removing these works the same as in the Settings (see above for details).
At the bottom of the screen you will have two options (depending on your access level). The first is Save as Template which will add the job details you have entered. The second (if you have access higher than Review) will be to Add Job. Clicking this will save the job details and post the job advert to www.FindMeACareJob.co.uk.

Once the job has been posted you will be given the option to view the application form. This will allow you to make sure that it displays and behaves as you’d like it to.

The Add Job page will also reload in an edit mode, allowing you to update the job advert with any changes you want to make. This will be highlighted by the title of the page changing to Update a Job.

While in edit mode, you can update the job advert using the Update Job button, Save as Template as before, delete the job using Delete Job (this will display as Close Job if applications have already been received for the job) and copy the link for the application for (for pasting into emails, onto a website etc.) by using Copy Application Link to Clipboard.

Recruitment Hub
The main area in the Recruitment area gives you a lot of visibility on the status of job adverts, applications received, messages to and from applicants, interviews and new staff workflows. The first tab, Your Jobs, gives you information on the job adverts.
Clicking Export Jobs Summary will export all data from this screen to an Excel/spreadsheet program. Templates will open a list of existing templates, allowing you to start creating a new job advert using a template or deleting a template. Clicking on a posted job’s title will load the Applications tab showing only applications for that job. Clicking on any of the numbered statistics to the right will load the Applications tab showing only applications for that job with the selected status.

The Applications tab shows summarised data for the applications received.
You can use the filters along the top to narrow down what you are looking for.
Clicking View Application will open the application form in a read-only view in your browser. Clicking on the applicant’s name will also do this. While viewing the application form you can also access the messaging system, view any attachments and print the form.

View Messages will open the messaging page. Here you can view all messages that have been received from and sent to the applicant. If there are unread messages from the applicant that this will be displayed to the right of the applicant’s record. Clicking on this will also load the messaging page.

Internal Comments will load a page which shows any comments made about the application internally. These comments are never shared with the applicant and can only be viewed from within the Recruitment area.
Back to Draft will set an application form with the status Reviewed back to draft. This is useful for if you require additional information from the applicant before an interview is arranged.
Toggle Reject/Review allows you to quickly reject applications which have the status Reviewed without having to send a message, or to set the status to Reviewed if the application was set to Rejected by accident. If the application has the status of Interview then you will be required to enter a reason for the rejection. You can choose to have this sent to the applicant as a message.
Appoint Applicant will allow you to process an applicant’s details and add them to the staff list. The application’s status must be Reviewed or Interview for this to work.
The Messages tab will show you similar data to the Applications tab, however only applicant’s who have sent or received messages will show here. Any applicants with new messages will appear at the top.
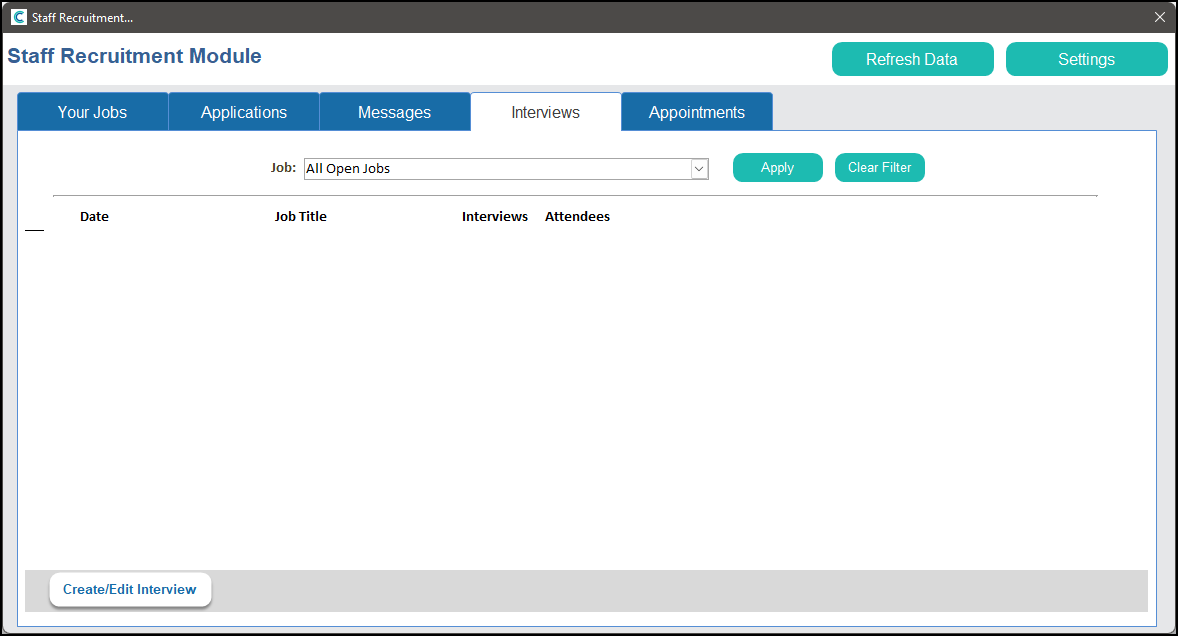
The Interviews tab will show a summary of any interviews for all open jobs (closed jobs can be viewed by selecting them from the dropdown list).

Clicking on Create/Edit Interview will allow you to manage new and existing interviews.
The Appointments tab will give a summary of how new staff are progressing with their initial workflows. We will look at this in detail later.
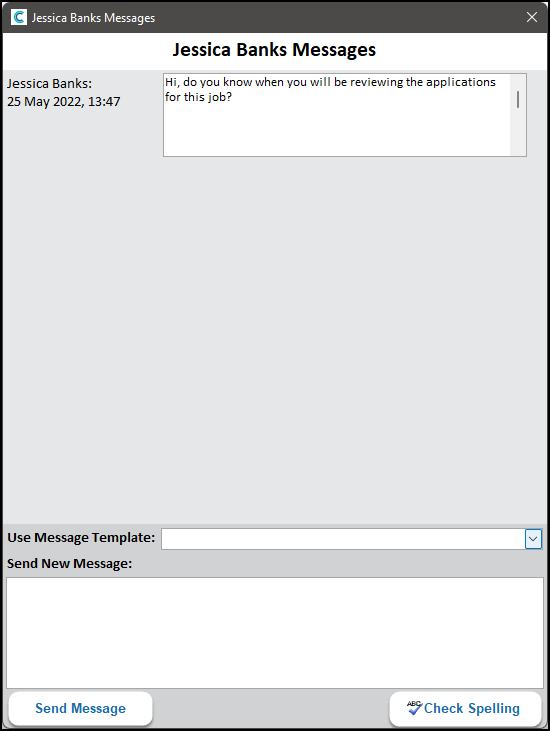
Messaging
You can access the messaging system from a number of areas within the Recruitment area. The messaging page looks like this.

As with other messaging systems, the messages are ordered from oldest to newest, however the page will load showing the newest messages. The page will check if more messages have been received every few seconds and will load them for you if there are any.
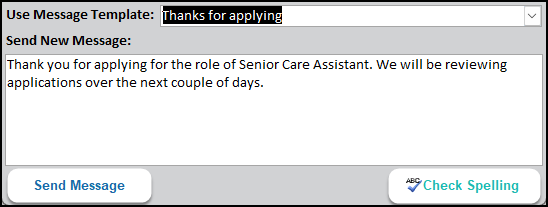
You can use the Message Templates to prepopulate the New Message box. It will automatically add the relevant information for the applicant.

Once you are happy you can send your message by clicking Send Message.
Internal Comments
This page will allow you to view any comments about the applicant/application. You can also add new comments here.
Creating and Cancelling Interviews
From the Interviews tab we can create and edit interviews.

The Organise Interviews page will open.
To create an interview you will need to:
- Select the job from the dropdown list.
- Select the applicant from the list on the left. Only applicants who have a status of Reviewed can have interviews created for them.
- Choose the date of the interview.
- Enter the start time.
- Make sure the planned duration is correct – this can be changed at this point if necessary.
- Select a location for the interview from the dropdown list or enter a new one. This can be an URL for an online meeting.
- Enter a message to send to the applicant. You can use message templates for this.
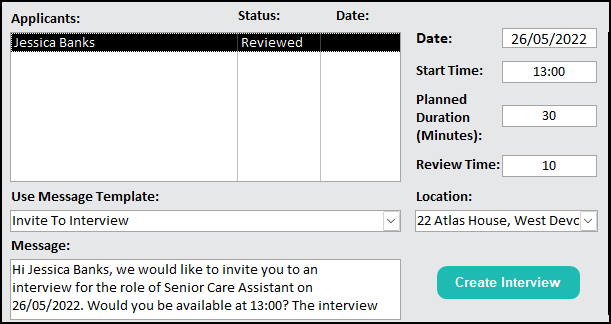
Clicking Create Interview will create an interview for the applicant and send a them a message.
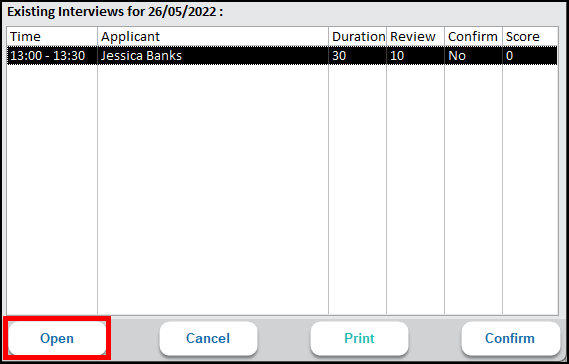
If the times for the interview overlap with another, a message will appear to say that the interview could not be created. To assist with this, a list of all interviews for the date selected will be shown on the right. Please note that an interview is considered as overlapping if it is within the time shown in the first column or within the time afterwards set aside for reviewing.
You can choose to confirm and interview when the applicant agrees to the time and date of the interview. To confirm, select the interview record and click Confirm.
If the applicant cannot make the interview, or you need to re-organise for some reason, you can cancel the interview by clicking Cancel.
The Interviews tab will be updated with the interviews you create.
Participating in Interviews
If you are participating in an interview then there are a couple of options for you.
- Recording interview notes in CC Windows
From the Organise Interviews page you can select the interview record and click Open.

In here you can view the applicant’s contact information, the duration of the interview, any comments added by anybody in the interview (these are refreshed every few seconds) and any scores which have been recorded.

For ease of access, you can also open the job description, the interviewee’s application form and any messages that have been sent to or received from the applicant.
- Print a note sheet
We have added the option for you to print a note sheet for the day’s interviews. You can use this by clicking Print in the Organise Interviews page.
Appointing Applicant
Following a successful interview you will want to add the applicant to your staff. We have made this easier for you as most of the information you need will be included in either the job advert or the application form. To appoint an applicant, click on Appoint Applicant on the Applications tab.

The Appoint a New Staff Member page will load.
It is advised that you revise all of the information on the page. Fields which are required are the Start Date and the permissions the new staff member will have. If you do not enter a Date of Birth then a pseudo date will be added for you – this is 01/01/2000.
To make this easier, we have added links to the job description, the application form and messages.
At the bottom of the page you have some additional options.
The system will default to send a message to the successful applicant, though this can be switched off if necessary.
You can decide here whether to keep the job advert open or close it to further applications. If you keep the job open then you can amend the existing end date or set it to have no end date. If you decide to close the job then you will have options on whether to message other applicants and which message template is used to do so.
When you are ready to proceed, click Process… During this process the information entered will be added to a new staff record, the application form and any attachments will be added to the Document Library and linked to the new staff record, the reference information will be used to create new references within the staff record and an unique PIN will be generated.
Once this process is complete, the Appointment Workflow page will open.
Appointment Workflow
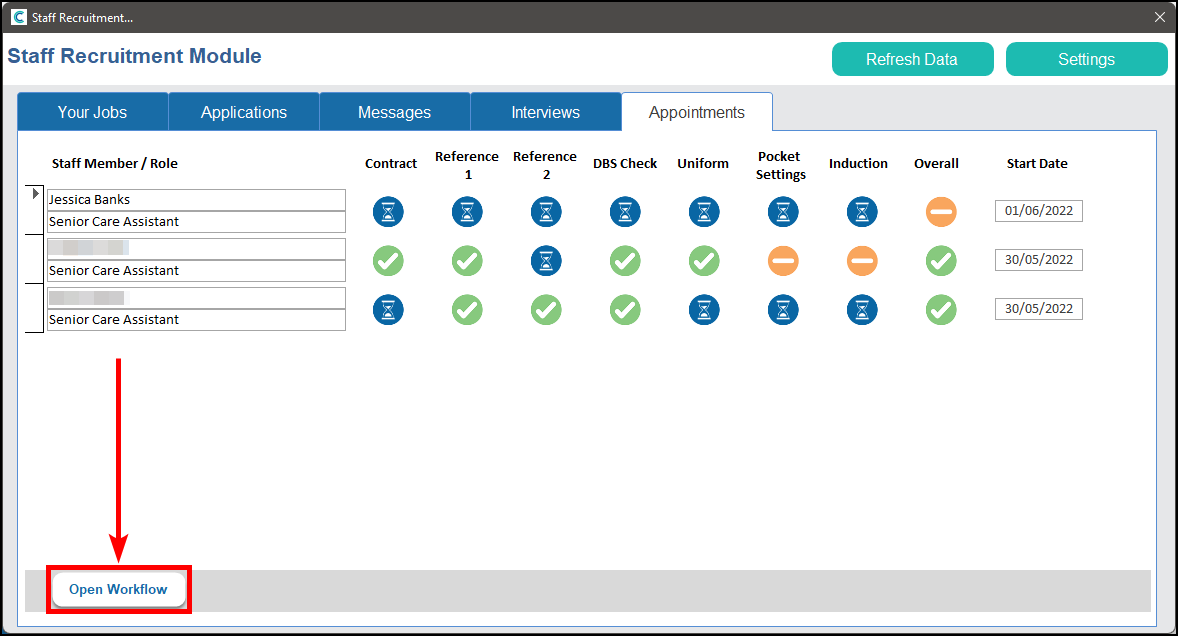
The Appointments tab in the Recruitment hub will look like this when you have new staff.

To access the Appointment Workflow for a staff member click Open Workflow.
Each workflow has up to seven steps which can each be switched on or off as needed. Please be aware that once a step has been started it cannot be switched off.

Here is how each step behaves:
- Contract
To send a contract to the new staff member, select the Contract from the dropdown list and click Send Contract. This will load the Merge Contract screen – this will take the selected contract and fill any placeholders with the staff member’s information.
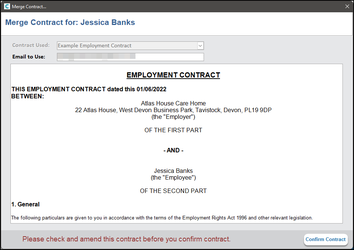
Here you can change the email address that the contract is sent to and make any changes to the contract. Once you are happy with this, click Confirm Contract. The status of the step will then be set to Contract sent.

You can view the contract by clicking on View Contract. This will allow you to resend the contract if necessary.
Once the contract has been read by the staff member the status will become Contract Read. When the contract has been signed, the step will be completed and the contract can no longer be sent. A link to the contract will also be added to the staff member’s Document Library.

- Reference 1 and Reference 2
The reference records will have been populated already however initially there is nothing to say that the reference has been requested or received. To mark a reference as requested, click Confirm Sent.

The status will be updated to Reference sent.

To record a response from a reference, click View Reference. This will open the Reference window. Click Record Response on there.
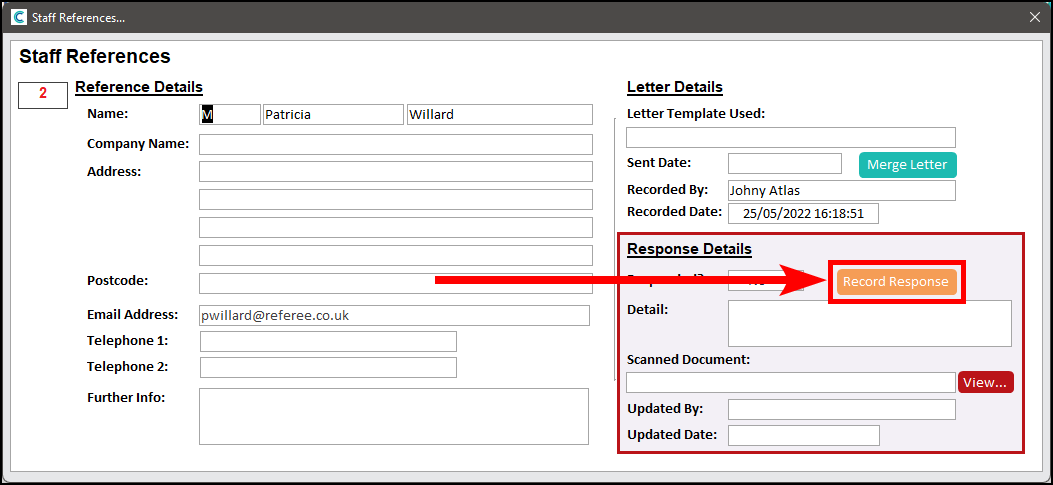
Enter the referee’s response and click Update.

The Workflow will be updated to show that the response has been received.

- DBS Check
You can record the DBS check for the new staff member.

Clicking Add/Update will open the DBS Update window.
If you do not mark that the DBS has been confirmed, clicking Update will set the DBS status as DBS Requested, marking that it is confirmed will set the status to DBS Received.

- Ordering Uniform
You can also track any uniform orders through the Workflow.

Enter a summary of what has been ordered into the text box provided and click Confirm Sent. The status will then be updated to Uniform Ordered and the text will be added to a note in the recruit’s Staff Record.

You can then update or replace the text and click Received once the uniform has been received.

- Setup Staff Pocket
We have made setting up new staff with staff-registered Pocket easier in the Workflow. When you click Send Details an email will be sent to the recruit with the Pocket code, their PIN and instructions on how to download the CC Pocket application.

Once the staff member has registered the CC Pocket application the status will be updated to Pocket Registered.

- Setup Induction
If you have created an Induction as mentioned above, you can select the Induction from the dropdown menu.

Before you set the Induction you can view what is included by clicking Induction Summary.
Clicking Set Induction will assign the Induction to the new staff member. They will be able to access this through CC Pocket.
You will be able to keep track of their Induction progress by returning to the Workflow and clicking Induction Summary.

The Induction can also be access through the Staff Record.

Staff Integrity Checks
As part of the Recruitment update we have added a few Staff File Integrity Checks to keep track of new staff Workflows.
